Mackie Onyx 820i Quick Start Guide - Page 13
Talkback, Talkback Mic, Talkback Level, Destination: Phones, Aux 1-2
 |
View all Mackie Onyx 820i manuals
Add to My Manuals
Save this manual to your list of manuals |
Page 13 highlights
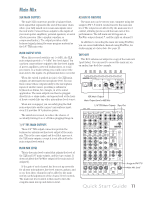
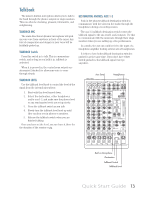
Talkback The mixer's built-in microphone allows you to talk to the band through the phones outputs or stage monitors. This can often be charming, pleasant, informative, and enlightening. TALKBACK MIC The omni-directional dynamic microphone will pick up your voice from anywhere in front of the mixer. Any hint of exasperation and despair in your voice will be faithfully picked up. TALKBACK Switch Press this switch in to talk. This is a momentary switch, and as long as you hold it in, talkback is activated. When it is pressed in, the control room outputs are attenuated (ducked) to allow your voice to come through clearly. DESTINATION: PHONES, AUX 1-2 Push in the phones talkback destination switch to communicate with the talent in the studio through the headphones during a recording session. The aux 1-2 talkback destination switch routes the talkback signal to the aux send 1 and 2 outputs. Use this to communicate with the musicians through their stage monitors when you are setting up a live performance. In a studio, the aux out could be fed to the input of a headphone amplifier feeding several sets of headphones. It is fine to have both talkback destination switches pushed in at the same time. If you don't have either switch pushed in, the talkback signal won't go anywhere. Aux Sends Headphones TALKBACK LEVEL Use the talkback level knob to control the level of the signal from the internal microphone. 1. Start with this level turned down. 2. Select the destination, either headphones and/or aux 1-2, and make sure the phones level or aux send master levels are set up nicely. 3. Press the talkback switch as you talk. 4. Slowly turn the talkback level knob up until they can hear you in phones or monitors. 5. Release the talkback switch when you are finished talking. Once you have set the level, you can leave it there for the duration of the session or gig. 1 ONYX MIC PRE 2 ONYX MIC PRE 3-4 ONYX MIC PRE AUX SEND BAL/UNBAL 1 AUX RETURN 1 BAL/UNBAL 2 L (MONO) MAIN OUT BAL/UNBAL L TAPE IN OUT L INSERT INSERT 2 L (MONO) BAL/UNBAL LINE IN 5-6 R LINE IN 7-8 R R 1 LINE BAL/UNBAL LINE HI-Z 48V 2 LINE BAL/UNBAL LINE HI-Z LINE 48V R +4dB -10dB 48V L (MONO) BAL/UNBAL R L (MONO) BAL/UNBAL R PREMIUM ANALOG MIXER w/ PERKINS EQ & FIREWIRE 30 U 20 30 U 40 20 GAIN 40 20 GAIN U 60 U 60 U -20dB +40dB -20dB +40dB 30 40 MIC GAIN U GAIN 60 -20dB +20dB U GAIN -20dB +20dB SEND U PRE POST EQ -15 +15 1k HIGH 12kHz SEND U PRE POST EQ -15 +15 1k HIGH 12kHz FREQ FREQ 100 8k U 100 8k U MID MID -15 +15 U -15 +15 U SEND U PRE POST EQ -15 +15 U -15 +15 U -15 +15 U HIGH 12kHz HIGH MID 2.5KHz LOW MID 400Hz SEND U PRE POST EQ SEND U INPUT LINE FW 1-2 -15 +15 HIGH 12kHz -15 +15 HIGH 12kHz U -15 +15 MID 2.5kHz U -15 +15 MID 2.5kHz U U -15 +15 LOW 80Hz AUX -15 +15 LOW 80Hz AUX -15 +15 LOW 80Hz AUX -15 +15 LOW 80Hz AUX -15 +15 LOW 80Hz AUX CTRL ROOM/PHONES SOURCE MAIN MIX TAPE FW 1-2 ALT 3-4 ASSIGN TO MAIN MIX OO MAX CONTROL ROOM OO MAX PHONES 0dB=0dBu LR 20 CLIP 15 10 6 3 0 2 LEVEL 4 SET 7 10 20 30 RUDE SOLO AUX MASTER SEND RETURN OO OO 1 MAX 2 MAX PAN L R OO OO 1 MAX 2 MAX PAN L R OO OO 1 MAX 2 MAX PAN L R OO OO 1 MAX 2 MAX PAN L R OO OO 1 MAX 2 MAX PAN L R PRE POST PRE POST OO OO 1 +15 RTN TO AUX1 2 +15 OO OO 1 +10 2 +10 AUX SEND 1-2 TO FW 5-6 POWER OO OO MUTE OL ALT 3-4 - 20 U MUTE OL ALT 3-4 - 20 U MUTE OL ALT 3-4 - 20 U MUTE OL ALT 3-4 - 20 U MUTE OL ALT 3-4 - 20 U MIC MAX LEVEL DESTINATION ASSIGN TO FW 7-8 U OO +10dB LEVEL SOLO 1 OO +10dB LEVEL SOLO 2 OO +10dB LEVEL SOLO 3-4 OO +10dB LEVEL SOLO 5-6 OO +10dB LEVEL SOLO 7-8 PHONES AUX 1-2 TALKBACK +10dB MAIN MIX Built-in Microphone Destination Talkback Switch Talkback Level Quick Start Guide 13
-
 1
1 -
2
-
3
-
4
-
5
-
6
-
7
-
 8
8 -
 9
9 -
 10
10 -
 11
11 -
 12
12 -
 13
13 -
 14
14 -
 15
15 -
 16
16 -
 17
17 -
 18
18 -
19
-
20
-
21
-
22
-
23
-
24
 |
 |
