Mackie d.2 Owner's Manual - Page 11
XLR MAIN OUTs, LINE/MIC Switch, RCA Main Outs, LIVE/RECORD Switch, POWER Switch, Power Receptacle, - firewire card
 |
View all Mackie d.2 manuals
Add to My Manuals
Save this manual to your list of manuals |
Page 11 highlights
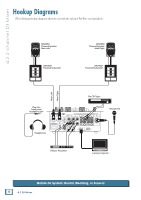
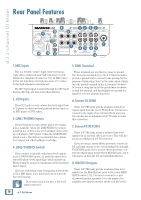
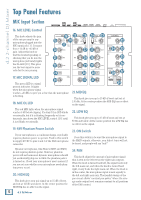
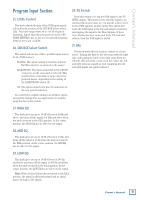
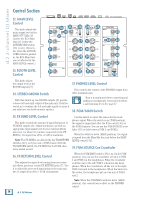
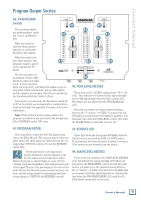
Owner's Manual If you only have one monitor speaker, just use one of the BOOTH Outputs and push in the BOOTH STEREO/ MONO switch [34] in the CONTROL section on the top panel. 9. XLR MAIN OUTs These male XLR connectors provide a balanced micor line-level signal from the MAIN LEVEL control [32]. The LINE/MIC Switch [10] determines if it is a miclevel or line-level output. Connect these to the balanced inputs of the active speakers, or power amplifier(s) powering your main speakers. If you are connecting the MAIN OUT of the d.2 to an unbalanced input, use the RCA Main Outs [11] instead. Note: Balanced connections offer better immunity to external noise (specifically, hum and buzz) than unbalanced connections. Because of this, it is the preferred interconnect method, especially in cases where very long lengths of cable are being used. A long unbalanced cable carries with it more opportunity for noise to get into the system - having balanced cables means very little noise will enter the system. If you must use an unbalanced connection, keep the cable length to 10 feet or less (3 meters). MAIN LEVEL control. This allows you to make a stereo recording that is not affected by Main Out level changes during a performance. 13. POWER Switch When the POWER switch is turned ON, power is supplied to the d.2 and the cool blue EQ knobs light up. 14. Power Receptacle This is a standard 3-prong IEC power connector. Connect the detachable linecord (included in the box with your d.2) to the power receptacle, and plug the other end of the linecord into an AC outlet. The d.2 has a universal power supply that can accept any AC voltage from 100 VAC to 240 VAC. No need for voltage select switches. It will work virtually anywhere in the world. That's why we call it a "Planet-Earth" power supply! This also means that it is less susceptible to voltage sags or spikes, providing greater electromagnetic isolation and better protection against AC line noise. 15. FIREWIRE I/O Option 10. LINE/MIC Switch If you are connecting the XLR MAIN OUTs [9] to linelevel inputs like a power amplifier's inputs, leave this switch out, in the LINE position. If you are using the d.2 as a submixer and connecting the XLR MAIN OUTS to the mic inputs of another mixer, push this switch in to the MIC position. This inserts a 30 dB pad to reduce the output signal to a mic level. This great feature allows you to connect the d.2 output directly to a snake without using direct boxes. 11. RCA Main Outs These RCA connectors provide an unbalanced linelevel signal from the MAIN OUT, either pre- or postMAIN LEVEL control [32], depending on the setting of the LIVE/RECORD switch [12]. 12. LIVE/RECORD Switch When this switch is out (LIVE position), the RCA Main Outs provide the signal just after the MAIN LEVEL control [32], so it essentially provides the same signal as the XLR MAIN OUTs [9], except it is an unbalanced signal rather than a balanced one. When this switch is pushed in (RECORD position), the RCA Main Outs provide the signal just prior to the FireWire (a.k.a. IEEE 1394) is a high-speed serial I/O interface for connecting digital devices, with more than 30 times the bandwidth of USB 1.1. You can install the optional FireWire card here, to provide two FireWire connectors for transferring digital audio to and from your laptop computer or digital audio workstation (DAW) with absolute zero latency. FIREWIRE The FireWire interface provides a stereo main output to your computer. The signals are pre-MAIN LEVEL control [32], so they are independent of any adjustments made to the MAIN LEVEL control. This allows you to record your live performance directly to your laptop. The FireWire interface also lets you use your computer to playback music for mixing on the d.2. It provides a return for four signals, which can be selected as the program source for PGM 1 and PGM 2. Assign two channels (or a stereo pair) to ASIO or CoreAudio outputs 1 and 2 for PGM 1, and two channels (or a stereo pair) to outputs 3 and 4 for PGM 2. The FireWire card can easily be installed with the help of a small screwdriver. Ask your Mackie dealer about it. (The FireWire card, not the screwdriver.) Each card comes with installation instructions that I have to write before the boss gets back from his vacation in Gary, Indiana. Owner's Manual 11
-
 1
1 -
2
-
3
-
4
-
5
-
 6
6 -
 7
7 -
 8
8 -
 9
9 -
 10
10 -
 11
11 -
 12
12 -
 13
13 -
 14
14 -
 15
15 -
 16
16 -
17
-
18
-
19
-
20
-
21
-
22
-
23
-
24
-
25
-
26
-
27
-
28
 |
 |