Magic Chef MCO165UW User Manual - Page 10
Power, Level, Cooking, Guide, Minute, Timer
 |
View all Magic Chef MCO165UW manuals
Add to My Manuals
Save this manual to your list of manuals |
Page 10 highlights
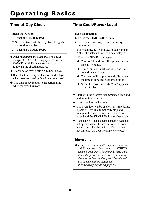
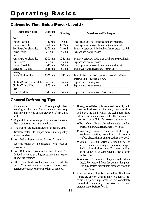
Operating Basics Power Level Cooking Guide The power levels on your microwave oven can be compared to the surface units on a range. High (power level 10) or full power is the fastest way to cook and gives you 100% power. Each power level gives you microwave energy for a certain percent of time, for example, power level 7 is microwave energy 70% of the time. Most of your cooking will be done on High (Power Level 10). a lower setting will cook more evenly and with less attention given to stirring or rotating the food. Some foods may have better flavor, texture or appearance if one of the lower settings is used. You may wish to use a lower power level when cooking foods that have a tendency to boil over, such as scalloped potatoes. Cooking times will increase as power level decreases. Power Level Best Uses High 10 Fish, bacon, vegetables, boiling liquids. Medium 7 Gentle cooking of meat and Poultry, baking casseroles and reheating. Medium 5 Slow cooking and tenderizing for stews and less tender cuts of meat. Low 3 Defrosting, simmering, delicate sauces. Warm 1 Keeping food warm without overcooking, softening butter. Add Minute The ADD MINUTE Pad provides a convenient way to heat foods at full power with one touch of a pad or add an extra minute to your cooking cycle while in progress. The microwave starts automatically after the pad is touched. ADD MINUTE cannot be used with ONE TOUCH COOKING FUNCTIONS, AUTO DEFROST, TIMER, FAVORITE CHOICE or WARM. Each time the pad is touched the oven will add 1 minute to the time up to 99 minutes. Timer Basic Instructions 1. Touch the TIMER Pad. 2. Enter desired time. The Display will show the selected time. 3. Touch the START Pad. ♦ The timer can be programmed up to 99 minutes and 99 seconds. ♦ Beeps signal the end of the timing operation. ♦ To stop the timer once it has started, touch the CANCEL/OFF pad. Display will return to the time of day. ♦ The timer cannot be set while cooking. ♦ The door must be shut for the timer to operate. 9
-
 1
1 -
2
-
3
-
4
-
 5
5 -
 6
6 -
 7
7 -
 8
8 -
 9
9 -
 10
10 -
 11
11 -
 12
12 -
 13
13 -
 14
14 -
 15
15 -
16
-
17
-
18
-
19
-
20
-
21
-
22
-
23
 |
 |