Magnavox DP170MGXF User manual, English (US) - Page 6
SETUP, Connections - hdmi
 |
View all Magnavox DP170MGXF manuals
Add to My Manuals
Save this manual to your list of manuals |
Page 6 highlights
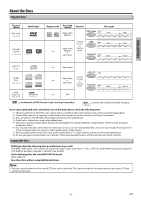
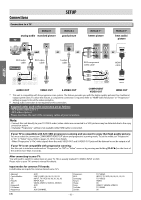
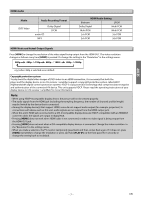
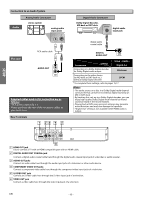
Connections SETUP Connection to a TV Method 1 Method 2 analog audio standard picture good picture TV AUDIO IN L R VIDEO IN and S-VIDEO IN or or RCA audio cable This unit RCA video cable S-video cable Method 3*1 better picture Method 4*2 best audio / picture COMPONENT VIDEO IN Y COMPONENT VIDEO IN Y CB or PB CR PR or HDMI IN RCA component video cable HDMI cable SETUP VIDEO OUT S-VIDEO OUT AUDIO OUT VIDEO OUT S-VIDEO OUT COMPONENT VIDEO OUT HDMI OUT *1 This unit is compatible with the progressive scan system. The feature provides you with the higher quality pictures than traditional output system does. To utilize this feature, a component connection is required. Refer to "HDMI Video Resolution" or " Progressive " setting on page 18 to set the video resolution. *2 Analog audio connection is not required for this connection. Supplied cables used in this connection are as follows: • RCA audio cable (L/R) x 1 • RCA video cable x 1 Please purchase the rest of the necessary cables at your local store. Note: • Connect this unit directly to your TV. If RCA audio / video cables are connected to a VCR, pictures may be distorted due to the copy protection system. • Changing " Progressive " setting is not available while HDMI cable is connected. If your TV is compatible with 525 (480) progressive scanning and you want to enjoy that high quality picture; You must select the connection COMPONENT VIDEO OUT above and progressive scanning mode. To set the mode, set "Progressive" to "On" in "Video" menu. Refer to pages 15-16 for more details. • When "Progressive" is "On", video signals from the unit's VIDEO OUT and S-VIDEO OUT jacks will be distored or not be output at all. If your TV is not compatible with progressive scanning; Use this unit in interlace mode and set "Progressive" to "Off" in "Video" menu or by pressing and holding [PLAY B] on the front of the unit for more than 5 seconds. After connecting to your TV: You will need to switch to video input on your TV. This is usually marked TV / VIDEO, INPUT or AUX. Please refer to your TV's owner's manual for details. Input modes for common TV brands: Listed below are inputs for common brand name TV's. Admiral: Curtis Mathis: GE: Hitachi: JVC: Kenwood: LXI-Series: Magnavox: EN AUX LINE1, LINE2, 00, 90, 91, 92, 93 INPUT, TV / VCR, 00, 90, 91, 92, 93 INPUT, AUX VIDEO, VIDEO1, VIDEO2, VIDEO3 AUX 00 AUX CHANNEL Panasonic: RCA: Samsung: Sanyo: Sharp: Sony: Toshiba: Zenith: - 6 - TV / VIDEO INPUT, TV / VCR, 00, 90, 91, 92, 93 TV / VIDEO VIDEO 00 VIDEO1, VIDEO2, VIDEO3 TV / GAME 00
-
 1
1 -
 2
2 -
 3
3 -
 4
4 -
 5
5 -
 6
6 -
 7
7 -
 8
8 -
 9
9 -
 10
10 -
 11
11 -
 12
12 -
13
-
14
-
15
-
16
-
17
-
18
-
19
-
20
-
21
-
22
-
23
-
24
 |
 |