Magnavox DV225MG9 User manual, English (US) - Page 9
Function Overview - rear view
 |
UPC - 053818570715
View all Magnavox DV225MG9 manuals
Add to My Manuals
Save this manual to your list of manuals |
Page 9 highlights
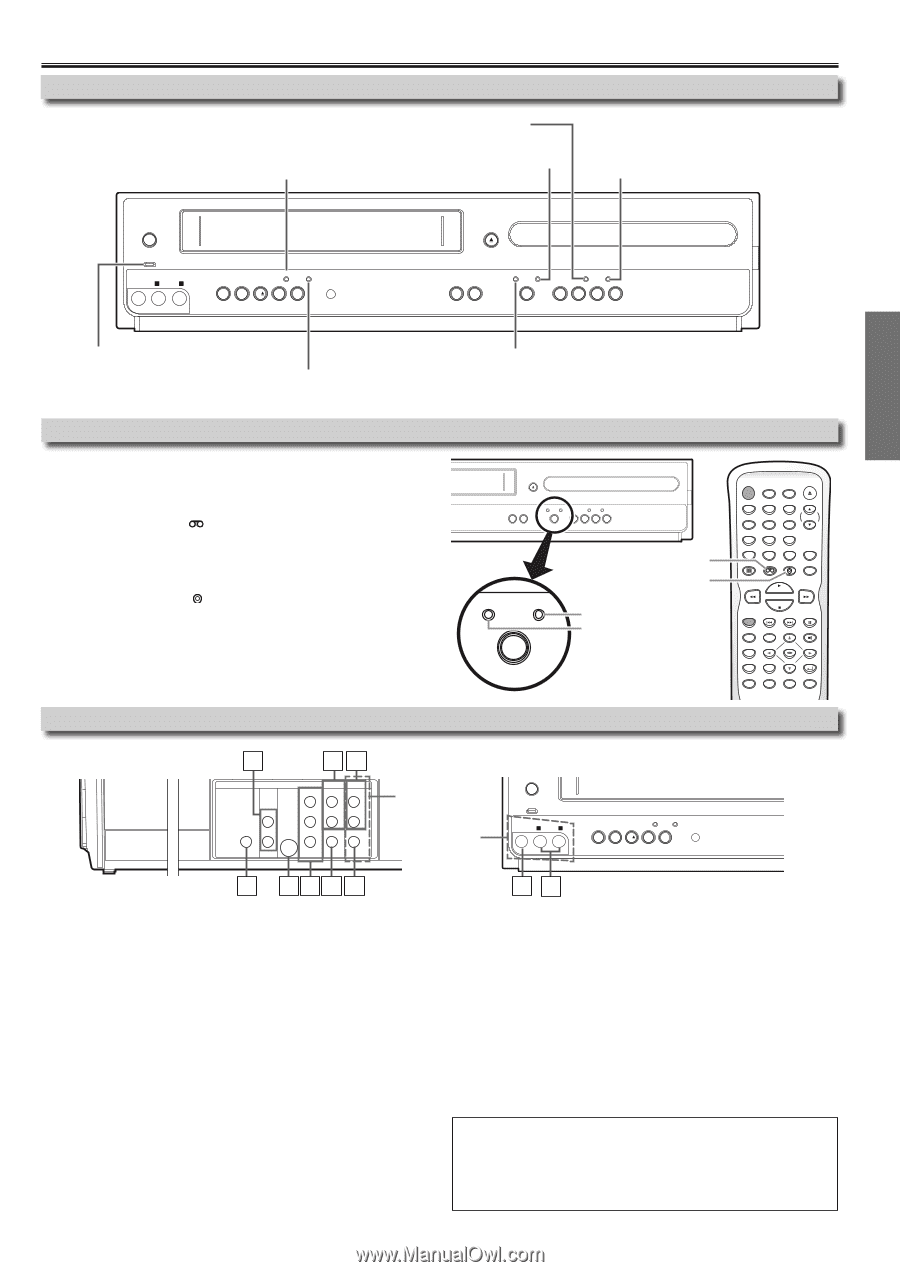
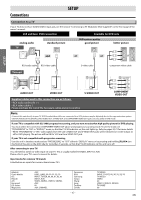
Function Overview Front Panel Indicator Lights Lights up when the progressive scan system is activated. Lights up during a recording or one-touch timer recording (OTR). Blinks when a recording is paused. Lights up when this unit is in the DVD mode. Lights up when the inserted disc is being played back. Blinks when an unplayable disc is inserted. B B SETUP STANDBY-ON y POWER ON VIDEO L - AUDIO - R h D C REC TIMER REC IR B I REW F.FWD STOP/EJECT PLAY RECORD OPEN/CLOSE TRACKING VCR DVD P-SCAN PLAY SOURCE H C B G PREV STOP PLAY NEXT B B Lights up when the unit is turned on. Lights up when this unit is in the VCR mode. Lights up when the timer recording or one-touch timer recording (OTR) has been set. Selecting DVD or VCR Operation You must first select either DVD or VCR operation. y VCR MODE Press [VCR ] on the remote control. (The VCR SOURCE light will illuminate.) DVD MODE Press [DVD ] on the remote control. (The DVD SOURCE light will illuminate.) OPEN/CLOSE TRACKING VCR DVD P-SCAN PLAY SOURCE H C B G PREV STOP PLAY NEXT VCR DVD VCR button DVD button DVD SOURCE light VCR SOURCE light SOURCE STANDBY-ON OPEN/CLOSE SPEED TIMER SET 12 45 78 CLEAR 0 DISPLAY VCR 3 TRACKING 6 9 INPUT +10 DVD MODE PLAY STOP RECORD PREV NEXT PAUSE TITLE SEARCH AUDIO DISC MENU OK SETUP ZOOM RETURN SUBTITLE ANGLE REPEAT A-B Front & Rear Terminals rear panel 1 23 DIGITAL AUDIO OUT DVD AUDIO OUT S-VIDEO OUT COMPONENT VIDEO OUT Y DVD/VCR AUDIO OUT L VCR AUDIO IN L L COAXIAL R CB/ PB R VIDEO OUT CR/ PR R VIDEO IN L1 front panel STANDBY-ON y POWER ON L2 VIDEO L - AUDIO - R h D C REC TIMER REC IR B I REW F.FWD STOP/EJECT PLAY RECORD 8 7 65 4 43 1: DVD AUDIO OUT* (analog) jacks Connect an audio cable from here to the audio input jack of your television or audio device. 2: DVD/VCR AUDIO OUT jacks Connect an audio cable from here to the audio input jack of your television or audio device. Standard connection for DVD/VCR use. 3: VCR AUDIO IN jacks Connect a stereo audio cable from the audio output jacks of your camcorder, VCR, etc. to here. After making the connection, press [INPUT] on the remote control. Select "L1" to activate the rear AUDIO IN jacks, or "L2" to activate the front. 4: VCR VIDEO IN jack Connect a video cable from the video output jack of your camcorder, VCR, etc. to here. After making the connection, press [INPUT] on the remote control. Select "L1" to activate the rear VIDEO IN jack, or "L2" to activate the front. 5: DVD/VCR VIDEO OUT jack Connect a video cable from here to the VIDEO input jack of your television or audio device. Standard connection for DVD/VCR use. 6: COMPONENT VIDEO OUT* jacks Connect a component video cable from here to the component video input jacks of your television. 7: S-VIDEO OUT* jack Connect an S-video cable from here to the S-video input jack of your television. 8: DIGITAL AUDIO OUT COAXIAL* jack Connect a digital audio coaxial cable from here to the digital audio input jack of your digital audio receiver. * For enhanced DVD viewing. DVD/VCR video and audio connections required to view cassette tapes. Note: • Audio and video cables are included for both VCR and DVD viewing. You can enhance your DVD picture and sound quality with an S-video cable, a component video cable, or a digital audio coaxial cable. Please purchase the necessary cables at your local store. (Refer to pages 6-7.) - 9 - EN
-
 1
1 -
2
-
3
-
 4
4 -
 5
5 -
 6
6 -
 7
7 -
 8
8 -
 9
9 -
 10
10 -
 11
11 -
 12
12 -
 13
13 -
 14
14 -
15
-
16
-
17
-
18
-
19
-
20
-
21
-
22
-
23
-
24
-
25
-
26
-
27
-
28
 |
 |