Magnavox MWR10D6 Quick Guide - Page 29
Basic recording - dvd recorder brand new
 |
View all Magnavox MWR10D6 manuals
Add to My Manuals
Save this manual to your list of manuals |
Page 29 highlights
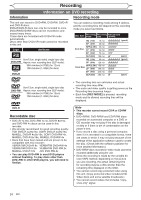
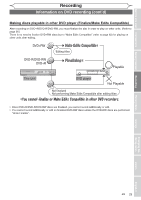
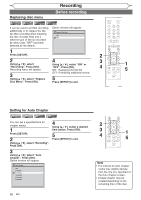
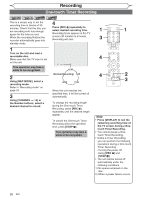
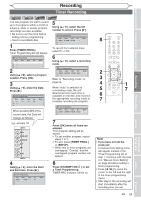
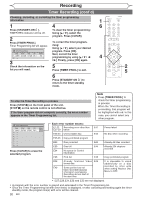
Before you start Connections Getting started Recording Recording Basic recording +VR +VR DVD+RW DVD+R DVD-RW DVD-R Follow the steps below to record TV programs. 7 Press [REC I] to start record- 1 1 ing. "I" mark will be displayed for 5 6 2 4 Press [STANDBY-ON ]. seconds. Turn the TV on and be sure to select the input to which the unit is I connected. Press [PAUSE F] to pause 2 recording. Press [PAUSE F] or [REC I] again to restart 8 7 Press [OPEN/CLOSE A]. recording. The disc tray will open. 3 8 Press [STOP C] to stop record- Insert your disc with its label facing up. Align the disc to the ing. The recorded title will be on the 7 5 disc tray guide. displayed title list. (Refer to "Guide 6 to a title list" on page 51.) Playing discs Editing Changing the Setup menu disc tray guide 4 Press [OPEN/CLOSE A] to close the disc tray. • When inserting a brand-new DVD+RW/DVD-RW disc, the unit automatically starts to format. • If titles have been recorded on the disc, the title list is displayed. Press [STOP C] to exit the title list. This operation may take a while to be completed. 5 Using [REC MODE], select a recording mode. Refer to "Recording mode" on page 24. HQ (1Hr) 0:58 Writing to Disc 90% 1 SP (2Hr) NOV/21/06 11:00AM CH12 SP NOV/21/06 0:20:44 2 ENPTY TITLE 1:41:17 SP (2Hr) • Press [STOP C] to exit the title list. 6 Using [CHANNEL - / +] or the Number buttons, select a desired channel to record. CH 12 Note • Recording starts immediately and continues until the disc is full or you stop recording. • When the unit clock has not been set, the space for a date and time of title names will be blank. • When you record a TV program which has Stereo and SAP audio, you have to select the TV channel audio (Stereo or SAP) beforehand. Only the selected channel audio will be recorded. Refer to "Selecting the TV stereo or SAP" on page 20 for more details. • You cannot change the recording mode during the REC pause mode. • You can change a channel during the REC pause mode. EN 27 Others Español
-
 1
1 -
2
-
3
-
4
-
5
-
6
-
7
-
8
-
9
-
10
-
11
-
12
-
13
-
14
-
15
-
16
-
17
-
18
-
19
-
20
-
21
-
22
-
23
-
 24
24 -
 25
25 -
 26
26 -
 27
27 -
 28
28 -
 29
29 -
 30
30 -
 31
31 -
 32
32 -
 33
33 -
 34
34 -
35
-
36
-
37
-
38
-
39
-
40
-
41
-
42
-
43
-
44
-
45
-
46
-
47
-
48
-
49
-
50
-
51
-
52
-
53
-
54
-
55
-
56
-
57
-
58
-
59
-
60
-
61
-
62
-
63
-
64
-
65
-
66
-
67
-
68
-
69
-
70
-
71
-
72
-
73
-
74
-
75
-
76
-
77
-
78
-
79
-
80
-
81
-
82
 |
 |