Magnavox TB110MW9A Owners Manual - Page 18
Advanced Operation
 |
View all Magnavox TB110MW9A manuals
Add to My Manuals
Save this manual to your list of manuals |
Page 18 highlights
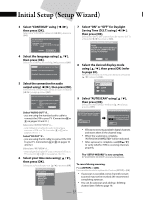
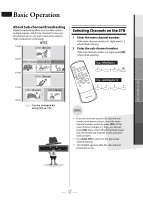
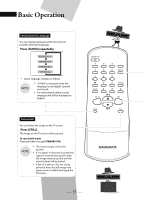
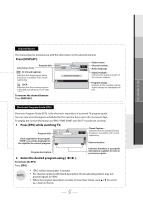
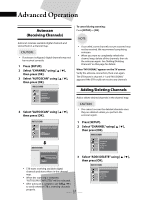
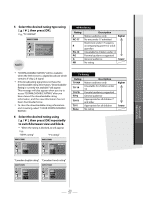
Advanced Operation Autoscan (Receiving Channels) Autoscan receives available digital channels and stores them in a channel map. CAUTION: • If autoscan is skipped, digital channels may not be received correctly. 1 Press [SETUP]. 2 Select "CHANNEL" using [ K / L], then press [OK]. 3 Select "AUTOSCAN" using [ K / L], then press [OK]. CHANNEL EXIT CHANNEL TIME DETAIL INITIAL ADD/DELETE ANTENNA AUTOSCAN RF OUT 4 Select "AUTOSCAN" using [ K / L], then press [OK]. To cancel during scanning: Press [SETUP] or [OK]. NOTE: • If canceled, some channels not yet scanned may not be received. We recommend completing autoscan. • When you want to completely refresh the channel map, delete all the channels, then do the autoscan again. See "Adding/Deleting Channels" on this page for details. When "NO SIGNAL" appears on the TV screen: Verify the antenna connection, then scan again. The STB tunes in channel 2-1 and "NO SIGNAL" appears if the STB could not receive any channels. Adding/Deleting Channels Add or delete desired channels in the channel map. CAUTION: • You cannot recover the deleted channels once they are deleted unless you perform the autoscan again. AUTOSCAN EXIT CHANNEL TIME DETAIL INITIAL AUTOSCAN will rescan all channels. This may take a while to complete. BACK AUTOSCAN AUTOSCAN The system is now scanning. 1 Press [SETUP]. 2 Select "CHANNEL" using [ K / L], then press [OK]. SETUP EXIT CHANNEL TIME DETAIL INITIAL ADD/DELETE ANTENNA AUTOSCAN RF OUT 12% EXIT Channel Found 3 Select "ADD/ DELETE" using [ K / L], then press [OK]. • STB starts receiving available digital channels and stores them in the channel map. • When the scanning is complete, "AUTOSCAN COMPLETED" will be indicated. • After autoscan is complete, use [CH K / L ] to verify whether STB is receiving channels properly. 18 EN CHANNEL EXIT CHANNEL TIME DETAIL INITIAL ADD/DELETE ANTENNA AUTOSCAN RF OUT
-
 1
1 -
2
-
3
-
4
-
5
-
6
-
7
-
8
-
9
-
10
-
11
-
12
-
 13
13 -
 14
14 -
 15
15 -
 16
16 -
 17
17 -
 18
18 -
 19
19 -
 20
20 -
 21
21 -
 22
22 -
 23
23 -
24
-
25
-
26
-
27
-
28
-
29
-
30
-
31
-
32
 |
 |