Makita AT2550A Owners Manual - Page 5
Functional Description, Assembly - tools
 |
View all Makita AT2550A manuals
Add to My Manuals
Save this manual to your list of manuals |
Page 5 highlights
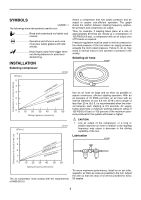
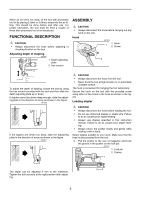
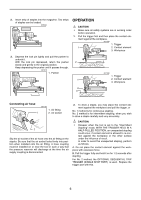
When an air set is not used, oil the tool with pneumatic tool oil by placing 2 (two) or 3 (three) drops into the air fitting. This should be done before and after use. For proper lubrication, the tool must be fired a couple of times after pneumatic tool oil is introduced. FUNCTIONAL DESCRIPTION CAUTION: • Always disconnect the hose before adjusting or checking function on the tool. Adjusting depth of stapling 007200 1. Depth adjusting plate 2. Hex wrench ASSEMBLY CAUTION: • Always disconnect the hose before carrying out any work on the tool. Hook 007315 1 1. Hook 2. Screw 2 2 1 To adjust the depth of stapling, loosen the bolt by using the hex wrench provided with the tool and then slide the depth adjusting plate up or down. If staples cannot be driven deep enough, slide the adjusting plate in the direction of arrow as shown in the figure. 007202 If the staples are driven too deep, slide the adjustinhg plate in the direction of arrow as shown in the figure. 007201 CAUTION: • Always disconnect the hose from the tool. • Never hook the tool at high location or on potentially unstable surface. The hook is convenient for hanging the tool temporarily. Secure the hook on the tool with the provided screw using either of two holes in the hook as shown in the figure. Loading stapler CAUTION: • Always disconnect the hose before loading the tool. • Do not use deformed staples or staple strip. Failure to do so causes poor staple feeding. • Always use staples specified in this instruction manual. Failure to do so causes poor staple feeding. • Always return the pusher slowly and gently while holding it with a hand. Select staples suitable for your work. Make sure that the hose is disconnected from the tool. 1. Pull the pusher to the rear of magazine and hook the groove in the pusher on the lock pin. 007211 1. Lock pin 2. Pusher 1 2 The depth can be adjusted 5 mm to the maximum. Tighten the bolt securely at the right position after adjusting. 5
-
 1
1 -
 2
2 -
 3
3 -
 4
4 -
 5
5 -
 6
6 -
 7
7 -
 8
8 -
 9
9 -
 10
10 -
 11
11 -
12
-
13
-
14
-
15
-
16
-
17
-
18
-
19
-
20
-
21
-
22
-
23
-
24
-
25
-
26
-
27
-
28
 |
 |
