Makita AT2550A Owners Manual - Page 7
Maintenance
 |
View all Makita AT2550A manuals
Add to My Manuals
Save this manual to your list of manuals |
Page 7 highlights
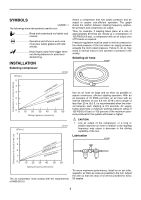
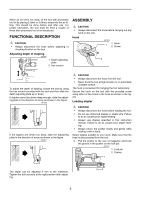
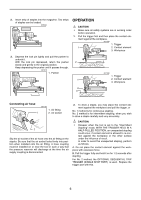
Direction of exhaust air 007207 1. Exhaust cover 1 Place the latch spring on two hooks of the driver guide and return it to its original position by pressing it. 007206 1. Driver guide 2 2. Latch 1 The direction of exhaust air can be changed 360 degrees of angle by turning the exhaust cover with a hand. Removing jammed staples WARNING: • Always disconnect the hose before removing staplers. Remove the staples from the magazine. Lift up the latch on the top of driver guide by hand. 007203 1. Driver guide 2 2. Latch 1 CAUTION: • If the tip of staple driver has worn, staple jamming and shallow driving will tend to occur. When this occurs, have it repaired by Makita Authorized or Factory Service Centers. MAINTENANCE CAUTION: • Always disconnect the air hose from the tool before attempting to perform inspection or maintenance. Maintenance of stapler Always check the tool for its overall condition and loose screws before operation. Tighten as required. 007313 If the latch cannot be lift up by hand, insert a slotted bit screwdriver in the gap between the latch and the door and force it up. 007204 1 2 3 1. Slotted bit screwdriver 2. Latch 3. Door With tool disconnected, make daily inspection to assure free movement of the contact element and trigger. Do not use tool if the contact element or trigger sticks or binds. 007310 Open the door and take out staples. 007205 1. Door 1 When the tool is not to be used for an extended period of time, lubricate the tool using pneumatic tool oil and store the tool in a safe place. Avoid exposure to direct sunlight and/or humid or hot environment. 7
-
 1
1 -
 2
2 -
 3
3 -
 4
4 -
 5
5 -
 6
6 -
 7
7 -
 8
8 -
 9
9 -
 10
10 -
 11
11 -
 12
12 -
13
-
14
-
15
-
16
-
17
-
18
-
19
-
20
-
21
-
22
-
23
-
24
-
25
-
26
-
27
-
28
 |
 |
