Makita EK6101 Operation Manual - Page 15
Putting Into Operation
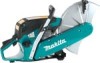 |
View all Makita EK6101 manuals
Add to My Manuals
Save this manual to your list of manuals |
Page 15 highlights
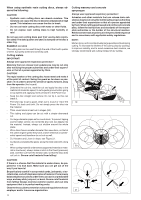
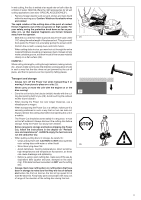
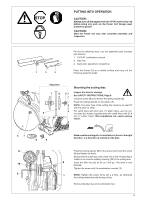
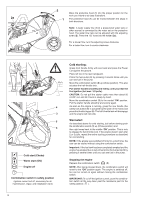
Sequence Putting into operation CAUTION: Always turn off the engine and pull off the spark plug cap before doing any work on the Power Cut! Always wear protective gloves! CAUTION: Start the Power Cut only after complete assembly and inspection. For the the following work, use the assembly tools included with delivery: 1. 13/19 AF combination wrench 2. Allen key 3. Carburetor adjustment screwdriver Place the Power Cut on a stable surface and carry out the following assembly steps: Mounting the cutting disc Inspect the disc for damage. See SAFETY INSTRUCTIONS, Page 8. Unscrew screw (9) and remove the spring washer (8). Place the cutting disc (5) on the arbour (7). NOTE: The arbor hole of the cutting disc must be an exact fit with the arbor or shaft. For cutoff discs with 25.4 mm (1") arbor holes, use the correct size disc holder (supplied only with cutoff discs with 25.4 mm (1") arbor holes). Non-compliance can cause serious injury! Make sure the cutting disc is installed so it turns in the right direction, if a direction is marked on the disc. 11 Place the spring washer (8) on the arbour and insert the screw (9) and tighten by hand. Slowly turn the cutoff disc until a hole (11) in the V-belt pulley is visible in the counter-holding opening (10) of the cutting arm. 10 8 Insert the Allen key (2) as far as it will go. The shaft is now blocked. Tighten the screw with the combination wrench (1). 2 1 NOTE: Tighten the screw firmly (30 ± 2 Nm), as otherwise the cutting wheel may slip during cutting. Remove the Allen key and combination tool. 15
-
 1
1 -
2
-
3
-
4
-
5
-
6
-
7
-
8
-
9
-
 10
10 -
 11
11 -
 12
12 -
 13
13 -
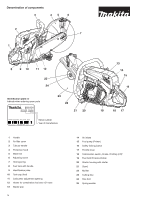 14
14 -
 15
15 -
 16
16 -
 17
17 -
 18
18 -
 19
19 -
 20
20 -
21
-
22
-
23
-
24
-
25
-
26
-
27
-
28
-
29
-
30
-
31
-
32
-
33
-
34
-
35
-
36
-
37
-
38
-
39
-
40
-
41
-
42
-
43
-
44
-
45
-
46
-
47
-
48
-
49
-
50
-
51
-
52
-
53
-
54
-
55
-
56
-
57
-
58
-
59
-
60
 |
 |
