Makita HB350 Instruction Manual - Page 10
Fig. 1, Fig. 2, Fig. 3, Fig. 4
 |
View all Makita HB350 manuals
Add to My Manuals
Save this manual to your list of manuals |
Page 10 highlights
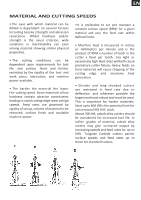
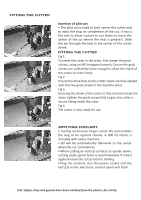
FITTING THE CUTTER Fig. 1 Fig. 2 Fig. 3 Fig. 3 Fig. 4 Fig. 4 Insertion of pilot pin • The pilot pin is used to both center the cutter and to eject the slug on completion of the cut. It has a flat side to allow coolant to run down to reach the center of the cut where the heat is greatest. Slide the pin through the hole in the center of the cutter shank. FITTING THE CUTTER Fig 1. To insert the cutter in the arbor, first loosen the grub screws, using an M5 hexagonal wrench. Ensure the grub screws are sufficiently loose enough to allow the shank of the cutter to enter freely. Fig 2. Ensure the drive flats on the cutter shank are fully aligned with the two grub screws in the machine arbor. Fig 3. Ensuring the shank of the cutter is fully inserted inside the arbor, tighten the grub screws fully to give the cutter a secure fitting inside the arbor. Fig 4. The cutter is now ready for use. APPLYING COOLANT • Cutting oil ensures longer cutter life and enables the slug to be ejected cleanly. A 500 ml bottle is included with every machine. • Oil will be automatically delivered to the cutter when the cut commences. • When cutting on vertical surfaces or upside down, cutting paste, gel or foam is recommended. It is best applied inside the cutter before drilling. • Plug the machine into the power socket and the red LED on the electronic control panel will flash. N.B. Safety strap and guards have been omitted from the photo's for clarity.
-
 1
1 -
2
-
3
-
4
-
 5
5 -
 6
6 -
 7
7 -
 8
8 -
 9
9 -
 10
10 -
 11
11 -
 12
12 -
 13
13 -
 14
14 -
 15
15 -
16
-
17
-
18
-
19
-
20
-
21
-
22
-
23
-
24
-
25
-
26
-
27
-
28
-
29
-
30
-
31
-
32
-
33
-
34
-
35
-
36
-
37
-
38
-
39
-
40
-
41
-
42
-
43
-
44
 |
 |
