Makita LXDT01Z Owners Manual - Page 7
Assembly, Operation
 |
View all Makita LXDT01Z manuals
Add to My Manuals
Save this manual to your list of manuals |
Page 7 highlights
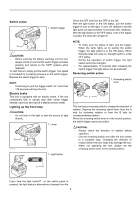
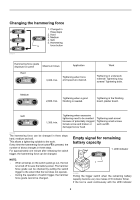
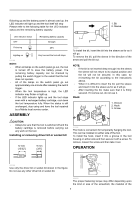
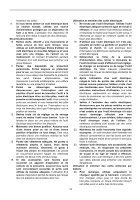
flickering up and the battery power is almost used up, the LED indicator will light up and the tool itself will stop Please refer to the following table for the LED indicator status and the remaining battery capacity. 1. Bit 2. Sleeve LED indicator status OFF Flickering Remaining battery capacity Enough 20% Lighting on Very low and the tool will stops 011188 NOTE: • When all lamps on the switch panel go out, the tool is turned off to save the battery power. The remaining battery capacity can be checked by pulling the switch trigger to the extent that the tool does not operate. • All of the lamps on the switch panel go out approximately one minute after releasing the switch trigger. • When the tool temperature is high, the LED indicator may flicker or light up. • If the LED indicator lights up and the tool stops even with a recharged battery cartridge, cool down the tool temperature fully. When the status is still unchanged, stop using and have the tool repaired by a Makita local service center. ASSEMBLY 1 2 009205 To install the bit, insert the bit into the sleeve as far as it will go. To remove the bit, pull the sleeve in the direction of the arrow and pull the bit out. NOTE: • If the bit is not inserted deep enough into the sleeve, the sleeve will not return to its original position and the bit will not be secured. In this case, try re-inserting the bit according to the instructions above. • When it is difficult to insert the bit, pull the sleeve and insert it into the sleeve as for as it will go. • After inserting the bit, make sure that it is firmly secured. If it comes out, do not use it. Hook 1. Groove 1 2. Hook 3. Screw CAUTION: • Always be sure that the tool is switched off and the battery cartridge is removed before carrying out any work on the tool. Installing or removing driver bit or socket bit 12 mm (15/32") 9 mm (3/8") 2 3 011186 The hook is convenient for temporarily hanging the tool. This can be installed on either side of the tool. To install the hook, insert it into a groove in the tool housing on either side and then secure it with a screw. To remove, loosen the screw and then take it out. OPERATION 001266 Use only the driver bit or socket bit shown in the figure. Do not use any other driver bit or socket bit. 009222 The proper fastening torque may differ depending upon the kind or size of the screw/bolt, the material of the 7
-
 1
1 -
 2
2 -
 3
3 -
 4
4 -
 5
5 -
 6
6 -
 7
7 -
 8
8 -
 9
9 -
 10
10 -
 11
11 -
 12
12 -
13
-
14
-
15
-
16
-
17
-
18
-
19
-
20
-
21
-
22
-
23
-
24
-
25
-
26
-
27
-
28
-
29
-
30
-
31
-
32
 |
 |
