Makita RP2301FC Owners Manual - Page 6
Assembly, Operation - router
 |
View all Makita RP2301FC manuals
Add to My Manuals
Save this manual to your list of manuals |
Page 6 highlights
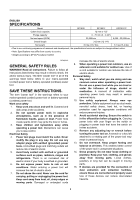
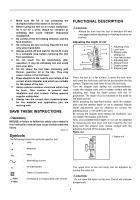
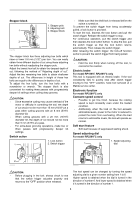
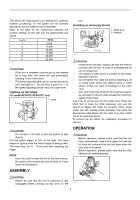
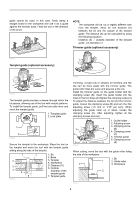
This allows the ideal speed to be selected for optimum material processing, i.e. the speed can be correctly adjusted to suit the material and bit diameter. Refer to the table for the relationship between the number settings on the dial and the approximate tool speed. 009876 Number 1 2 3 4 5 6 RPM 9,000 11,000 14,000 17,000 20,000 22,000 CAUTION: • If the tool is operated continuously at low speeds for a long time, the motor will get overloaded, resulting in tool malfunction. • The speed adjusting dial can be turned only as far as 6 and back to 1. Do not force it past 6 or 1, or the speed adjusting function may no longer work. Lighting up the lamps For model RP1801F, RP2301FC only 1. Lamp 1 009866 CAUTION: • Do not look in the light or see the source of light directly. Pull the switch trigger to turn on the light. The lamp keeps on lighting while the switch trigger is being pulled. The lamp turns off 10 - 15 seconds after releasing the trigger. NOTE: • Use a dry cloth to wipe the dirt off the lens of lamp. Be careful not to scratch the lens of lamp, or it may lower the illumination. ASSEMBLY tool. Installing or removing the bit 1. Shaft lock 2. Wrench 1 2 009854 CAUTION: • Install the bit securely. Always use only the wrench provided with the tool. A loose or overtightened bit can be dangerous. • Use always a collet which is suitable for the shank diameter of the bit. • Do not tighten the collet nut without inserting a bit or install small shank bits without using a collet sleeve. Either can lead to breakage of the collet cone. • Use only router bits of which the maximum speed, as indicated on the bit, does exceed the maximum speed of the router. Insert the bit all the way into the collet cone. Press the shaft lock to keep the shaft stationary and use the wrench to tighten the collet nut securely. When using router bits with smaller shank diameter, first insert the appropriate collet sleeve into the collet cone, then install the bit as described above. To remove the bit, follow the installation procedure in reverse. OPERATION CAUTION: • Before operation, always make sure that the tool body automatically rises to the upper limit and the bit does not protrude from the tool base when the lock lever is loosened. • Before operation, always make sure that the chip deflector is installed properly. CAUTION: • Always be sure that the tool is switched off and unplugged before carrying out any work on the 009860 6
-
 1
1 -
 2
2 -
 3
3 -
 4
4 -
 5
5 -
 6
6 -
 7
7 -
 8
8 -
 9
9 -
 10
10 -
 11
11 -
 12
12 -
13
-
14
-
15
-
16
-
17
-
18
-
19
-
20
-
21
-
22
-
23
-
24
-
25
-
26
-
27
-
28
-
29
-
30
-
31
-
32
 |
 |
