Makita RP2301FC Owners Manual - Page 8
Templet guide optional accessory, Trimmer guide optional accessory - template guide
 |
View all Makita RP2301FC manuals
Add to My Manuals
Save this manual to your list of manuals |
Page 8 highlights
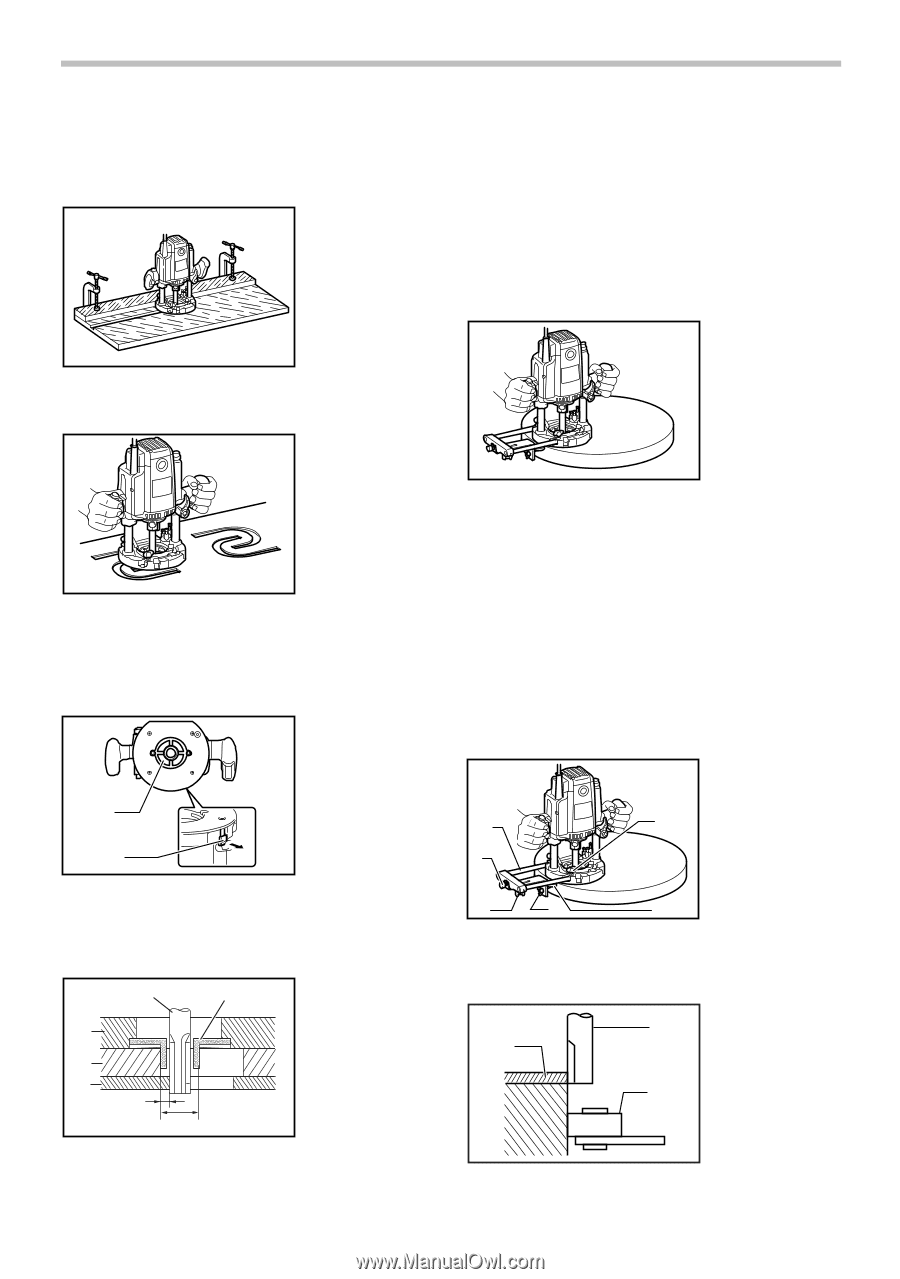
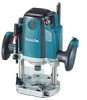
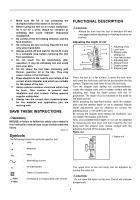
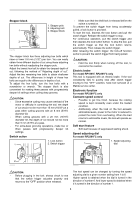
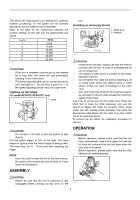
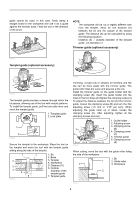
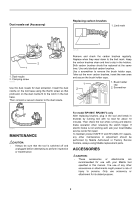
guide cannot be used. In this case, firmly clamp a straight board to the workpiece and use it as a guide against the trimmer base. Feed the tool in the direction of the arrow. NOTE: • The workpiece will be cut a slightly different size from the templet. Allow for the distance (X) between the bit and the outside of the templet guide. The distance (X) can be calculated by using the following equation: Distance (X) = (outside diameter of the templet guide - bit diameter) / 2 Trimmer guide (optional accessory) 009861 Templet guide (optional accessory) 009867 009862 The templet guide provides a sleeve through which the bit passes, allowing use of the tool with templet patterns. To install the templet guide, pull the lock plate lever and insert the templet guide. 1. Template guide 2. Lock plate 1 2 009863 Secure the templet to the workpiece. Place the tool on the templet and move the tool with the templet guide sliding along the side of the templet. 1 7 2 3 4 5 6 003695 1. Bit 2. Base 3. Templet 4. Workpiece 5. Distance (X) 6. Outside diameter of the templet guide 7. Templet guide Trimming, curved cuts in veneers for furniture and the like can be done easily with the trimmer guide. The guide roller rides the curve and assures a fine cut. Install the trimmer guide on the guide holder with the clamping screw (B). Insert the guide holder into the holes in the tool base and tighten the clamping screw (A). To adjust the distance between the bit and the trimmer guide, loosen the clamping screw (B) and turn the fine adjusting screw (1.5 mm or 1/16" per turn). When adjusting the guide roller up or down, loosen the clamping screw (C). After adjusting, tighten all the clamping screws securely. 1 2 3 4 009868 1. Guide holder 2. Adjusting screw 3. Clamping screw 6 (B) 4. Clamping screw (C) 5. Trimmer guide 6. Clamping screw 5 (A) When cutting, move the tool with the guide roller riding the side of the workpiece. 1. Bit 1 2. Guide roller 3 3. Workpiece 2 003701 8
-
 1
1 -
2
-
 3
3 -
 4
4 -
 5
5 -
 6
6 -
 7
7 -
 8
8 -
 9
9 -
 10
10 -
 11
11 -
 12
12 -
 13
13 -
14
-
15
-
16
-
17
-
18
-
19
-
20
-
21
-
22
-
23
-
24
-
25
-
26
-
27
-
28
-
29
-
30
-
31
-
32
 |
 |