Makita SK106GDZ SK106 Instruction Manual
Makita SK106GDZ Manual
 |
View all Makita SK106GDZ manuals
Add to My Manuals
Save this manual to your list of manuals |
Makita SK106GDZ manual content summary:
- Makita SK106GDZ | SK106 Instruction Manual - Page 1
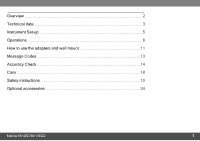
Overview Technical data Instrument Set-up Operations How to use the adapters and wall mount Message Codes Accuracy Check Care Safety instructions Optional accessories Makita SK106D/SK106GD 2 3 5 8 11 13 14 18 19 24 1 - Makita SK106GDZ | SK106 Instruction Manual - Page 2
ie w The Makita SK106D/SK106GD is a self-levelling multifunctional laser. It combines the advantage of a cross-line laser and a point laser in one tool. It is a reliable precision laser for any kind of tasks like levelling, plumbing, transfering and setting out right angles. It supports you on job - Makita SK106GDZ | SK106 Instruction Manual - Page 3
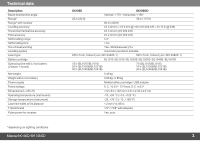
Levelling accuracy Horizontal/Vertical line accuracy Point accuracy Self-levelling range Self-levelling time Out-of-level warning Levelling system Laser (BL1020B/BL1021B) 20 h (BL1040B/BL1041B) 0.48 kg 0.69 kg - 0.85 kg Makita battery cartridge / USB adapter D.C. 10.8 V - 12 Vmax, D.C. in 5 V - Makita SK106GDZ | SK106 Instruction Manual - Page 4
on your region of residence. WARNING Only use the battery cartridges listed above. Use of any other battery cartridges may cause injury and/or fire. Makita SK106D/SK106GD 4 - Makita SK106GDZ | SK106 Instruction Manual - Page 5
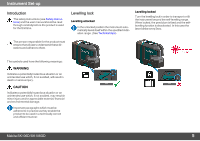
n tSe t-u p Introduction The safety instructions (see Safety Instructions) and the user manual should be read through carefully before the product is used for the first time. Levelling lock Levelling unlocked In the unlocked position the instrument automatically levels itself within the specified - Makita SK106GDZ | SK106 Instruction Manual - Page 6
lines over long distances or in unfavourable lighting conditions, a laser receiver can be used. We recommend the Makita LDX1 laser receiver. Li-Ion battery Installing or removing battery cartridge CAUTION Always switch off the tool before installing or removing of the battery cartridge. CAUTION - Makita SK106GDZ | SK106 Instruction Manual - Page 7
Instrument Set-up Using the USB adapter (optional) Makita CXT batteries Indicating the remaining battery capacity Only for battery cartridges with the indicator Depending battery capacity. The indicator lamps (1) light up for a few seconds and show the remaining capacity: Makita SK106D/SK106GD 7 - Makita SK106GDZ | SK106 Instruction Manual - Page 8
Operations Op e ra tio n s Switching ON/Set key If the instrument is locked press laser key 3 times to switch off: Brightness reduction Makita SK106D/SK106GD 8 - Makita SK106GDZ | SK106 Instruction Manual - Page 9
Operations Functions with unlocked levelling Horizontal / Vertical lines and dots Horizontal line and dots Vertical line and dots Makita SK106D/SK106GD 9 - Makita SK106GDZ | SK106 Instruction Manual - Page 10
Operations Functions with locked levelling Horizontal line and dots Vertical line and dots Horizontal line tilted Makita SK106D/SK106GD 10 - Makita SK106GDZ | SK106 Instruction Manual - Page 11
a d a p te rs a n d wa lmo u n t PRO L-adapter Alignment of vertical laser lines Wall mount (optional accessory) Put the instrument on PRO L-adapter and fix it by thread. PRO the horizontal line to the desired reference level. The wall mount is a single item and will not be delivered with the - Makita SK106GDZ | SK106 Instruction Manual - Page 12
How to use the adapters and wall mount Different fixing applications Makita SK106D/SK106GD 12 - Makita SK106GDZ | SK106 Instruction Manual - Page 13
and instrument is at low power Instrument is out of self-levelling Levelling lock is activated and instrument is at low power Normal, levelling lock is activated Levelling lock is activated and laser set at reduced brightness Correction OK - or press ON / Set key for 2 seconds to get strong - Makita SK106GDZ | SK106 Instruction Manual - Page 14
of the levelling Makita SK106D/SK106GD Set the instrument on a tripod half-way between two walls (A+B) that are approx. 5 m apart. Place the lock switch in the "Unlocked" position (see Levelling lock). Direct the instrument at wall A and switch on the instrument. Activate the horizontal laser line - Makita SK106GDZ | SK106 Instruction Manual - Page 15
Unlocked" position (see Levelling lock). Position the instrument approx Activate the laser line and mark the intersection point of laser crosshairs on switch in the "Unlocked" position (see Levelling lock). As a reference, use a plumbbob off the maximum deviation of the laser line from the top of the - Makita SK106GDZ | SK106 Instruction Manual - Page 16
in the "Unlocked" position (see Levelling lock). Set up the laser on its tripod to wall mount from point B1. The horizontal laser is aligned in direction 1. Mark the laser points A1 and B1 with a to direction 1. Adjust the instrument so that the laser beam hits point A1 exactly. If point B2 is - Makita SK106GDZ | SK106 Instruction Manual - Page 17
horizontal points Place lock switch in "Unlocked" position (see Levelling lock). Mark a reference point (P1) approx. 5m from outside of the specified tolerance, please contact a local dealer or an authorised Makita distributor. Afterwards turn the instrument exactly 180° around the plumb point P1 - Makita SK106GDZ | SK106 Instruction Manual - Page 18
the instrument may damage it. Check the instrument for any damage before using it. Check the levelling accuracy of the instrument regularly. To warranty the best precision and visibility please clean the optics of dry it (max. 70°C/158°F) before repacking it into the case. Makita SK106D/SK106GD 18 - Makita SK106GDZ | SK106 Instruction Manual - Page 19
the product and the instructions in the User Manual. 2. To be familiar with local safety regulations relating to accident prevention. 3. Always prevent access to the product by unauthorised personnel. Permitted use 1. Projection of horizontal and vertical laser lines and laser points Prohibited use - Makita SK106GDZ | SK106 Instruction Manual - Page 20
of fire. Important safety instructions for battery cartridge 1. Before using battery cartridge, read all instructions and cautionary markings on (1) of battery. 12. Use the batteries only with the products specified by Makita. Installing the batteries to non-compliant products may result in a fire - Makita SK106GDZ | SK106 Instruction Manual - Page 21
instructions CAUTION Only use genuine Makita batteries. Use of nongenuine Makita batteries, or batteries that have been altered, may result in the battery bursting causing fires, personal injury and damage. It will also void the Makita warranty for the Makita the battery service life. 3. Levelling - Makita SK106GDZ | SK106 Instruction Manual - Page 22
radio frequency energy and, if not installed and used in accordance with the instructions, may cause harmful interference to radio communications. However, there is no guarantee accept any interference received, including interference that may cause undesired operation. Makita SK106D/SK106GD 22 - Makita SK106GDZ | SK106 Instruction Manual - Page 23
instructions Laser classification WARNING Looking directly into the beam with optical aids (e.g. binoculars, telescopes) can be hazardous. CAUTION Looking into the laser beam may be hazardous to the eyes. The instrument produces visible laser data) without prior notice. Makita SK106D/SK106GD 23 - Makita SK106GDZ | SK106 Instruction Manual - Page 24
with your Makita tool specified in this manual. The use Laser receiver LDX1 l Wall mount l Tripod l Laser viewing glass l Storage case l Target plate l Hand strap l Aluminium rod If you need any assistance for more details regarding these accessories, ask your local Makita Service Center. Makita
-
 1
1 -
 2
2 -
 3
3 -
 4
4 -
 5
5 -
 6
6 -
 7
7 -
8
-
9
-
10
-
11
-
12
-
13
-
14
-
15
-
16
-
17
-
18
-
19
-
20
-
21
-
22
-
23
-
24
 |
 |

Overview
2
Technical data
3
Instrument Set-up
5
Operations
8
How to use the adapters and wall mount
11
Message Codes
13
Accuracy Check
14
Care
18
Safety instructions
19
Optional accessories
24
Makita SK106D/SK106GD
1