Makita SK106GDZ SK106 Instruction Manual - Page 17
Perpendicularity horizontal points, cified tolerance, please contact a local dealer
 |
View all Makita SK106GDZ manuals
Add to My Manuals
Save this manual to your list of manuals |
Page 17 highlights
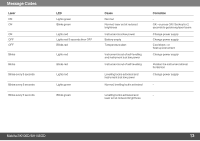
Accuracy Check Perpendicularity horizontal points Place lock switch in "Unlocked" position (see Levelling lock). Mark a reference point (P1) approx. 5m from the walls and position the lower plumb point exactly on it. Align the cross hair to the left wall and mark the intersection point (a1) approx. on the same hight like P1 to the wall. Shortly after mark the right-hand perpendicular beam (b1) on the front wall. Then rotate the instrument exactly 90° clockwise around the plumb point P1 and position the lefthand perpendicular beam to the existing reference point a1. Make sure that the upper plumb point is still exactly on the reference P1. Check afterwards the new reference point b2 with the old reference b1 on the front wall. The deviation between the two points may be max. 3mm. Mark the new position of the right-hand perpendicular beam to the right wall with c1. Should your instrument be outside of the specified tolerance, please contact a local dealer or an authorised Makita distributor. Afterwards turn the instrument exactly 180° around the plumb point P1 and position the righthand perpendicular beam to the existing reference point a1. Make sure that the upper plumb point is still exactly on the reference P1. Then mark the left-hand beam to the right wall and mark it with c2. Finally measure the difference between the former reference point c1 and the new point c2. The deviation may be max. 3mm between these two points. Should your instrument be outside of the specified tolerance, please contact a local dealer or an authorised Makita distributor. Makita SK106D/SK106GD 17
-
 1
1 -
2
-
3
-
4
-
5
-
6
-
7
-
8
-
9
-
10
-
11
-
 12
12 -
 13
13 -
 14
14 -
 15
15 -
 16
16 -
 17
17 -
 18
18 -
 19
19 -
 20
20 -
 21
21 -
 22
22 -
23
-
24
 |
 |
