Makita UC4030A Owners Manual - Page 16
Bucking a log, Carrying tool
 |
View all Makita UC4030A manuals
Add to My Manuals
Save this manual to your list of manuals |
Page 16 highlights
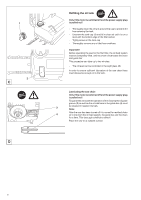
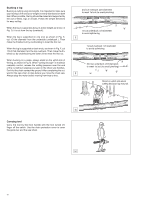
Bucking a log Bucking is cutting a log into lengths. It is important to make sure your footing is firm and your weight is evenly distributed on both feet. When possible, the log shoutd be raised and supported by the use of limbs, logs or chocks. Follow the simple directions for easy cutting. When the log is supported along its entire Iength as shown in Fig. D, it is cut from the top (overbuck). When the log is supported on one end, as shown in Fig. E, cut 1/3 the diameter from the underside (underbuck ). Then make the finished cut by overbucking to meet the first cut. When the log is supported on both ends, as shown in Fig. F, cut 1/3 of that diameter from the top overbuck. Then make the finished cut by underbucking the lower 2/3 to meet the first cut. When bucking on a slope, always stand on the uphill side of the log, as shown in Fig. G. When "cutting through", to maintain complete control, release the cutting pressure near the end of the cut without relaxing your grip on the chain saw handles. Don't let the chain contact the ground. After completing the cut, wait for the saw chain to stop before you move the chain saw. Always stop the motor before moving from tree to tree. 2nd cut overbuck (2/3 diameter) to meet 1st cut (to avoid pinching) Tension side Pressure side 1st cut underbuck (1/3 diameter) to avoid splintering E 1st cut overbuck (1/3 diameter) to avoid splintering Pressure side Tension side 2nd cut underbuck (2/3 diameter) to meet 1st cut (to avoid pinching) F Stand on uphill side when cutting because log may roll. G Carrying tool Carry the tool by the front handle with the tool turned off, finger off the switch. Use the chain protection cover to cover the guide bar and the saw chain. H 16
-
 1
1 -
2
-
3
-
4
-
5
-
6
-
7
-
8
-
9
-
10
-
 11
11 -
 12
12 -
 13
13 -
 14
14 -
 15
15 -
 16
16 -
 17
17 -
 18
18 -
 19
19 -
 20
20 -
 21
21 -
22
-
23
-
24
-
25
-
26
-
27
-
28
-
29
-
30
-
31
-
32
-
33
-
34
-
35
-
36
-
37
-
38
-
39
-
40
-
41
-
42
-
43
-
44
-
45
-
46
-
47
-
48
-
49
-
50
-
51
-
52
-
53
-
54
-
55
-
56
-
57
-
58
-
59
-
60
-
61
-
62
-
63
-
64
-
65
-
66
-
67
-
68
 |
 |
