Makita XJP03Z Makita XJP03 Instruction Manual - Page 10
Maintenance
 |
View all Makita XJP03Z manuals
Add to My Manuals
Save this manual to your list of manuals |
Page 10 highlights
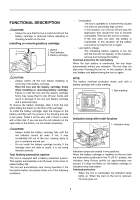
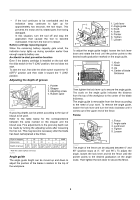
7. Switch on the tool and gently push it forward to extend the blade into the workpiece. 8. Gently return the tool to the original position after the adjusting screw reaches the stopper. 9. For Corner Joint and T-Butt Joint only Clamp the horizontal workpiece to the workbench. For Miter Joint only Clamp the other workpiece to the workbench with the mitered edge facing up. For Frame Joint and Edge-To-Edge Joint only Clamp the other workpiece to the workbench. 10. For Corner Joint only Place the tool on the workpiece so that the blade is facing down. For T-Butt Joint only Remove the angle guide from the tool. Place the tool on the workpiece so that the blade is facing down. 11. Repeat the steps 6 - 8 to groove in the horizontal or the other workpiece. If you do not need to center the blade in the board thickness, proceed as follows: For Corner Joint, Miter Joint, Frame Joint and EdgeTo-Edge Joint only • Remove the angle guide from the tool. Set the fence at 90° for Corner Joint, Frame Joint and Edge-To-Edge Joint or at 45° for Miter Joint. • Follow steps 1 - 11 excluding steps 5 and 10 described above. For T-Butt Joint only • Fit the two workpieces together as they will appear in the finished joint position. • Lay the vertical workpiece on the horizontal one. Clamp both workpieces to the workbench. • Remove the angle guide from the tool. • Follow the steps 2, 4, 6, 7, 8 and 11 described above. MAINTENANCE CAUTION: • Always be sure that the tool is switched off and the battery cartridge is removed before attempting to perform inspection or maintenance. • Never use gasoline, benzine, thinner, alcohol or the like. Discoloration, deformation or cracks may result. 1. Exhaust vent 1 2. Inhalation vent 2 014913 The tool and its air vents have to be kept clean. Regularly clean the tool's air vents or whenever the vents start to become obstructed. Replacing carbon brushes 1. Limit mark 1 001145 Remove and check the carbon brushes regularly. Replace when they wear down to the limit mark. Keep the carbon brushes clean and free to slip in the holders. Both carbon brushes should be replaced at the same time. Use only identical carbon brushes. Insert the top end of slotted bit screwdriver into the notch in the tool and remove the holder cap cover by lifting it up. 1. Holder cap 1 cover 2. Screwdriver 2 014914 Use a screwdriver to remove the brush holder caps. Take out the worn carbon brushes, insert the new ones and secure the brush holder caps. 1 1. Brush holder cap 2. Screwdriver 2 014915 10
-
 1
1 -
2
-
3
-
4
-
 5
5 -
 6
6 -
 7
7 -
 8
8 -
 9
9 -
 10
10 -
 11
11 -
 12
12 -
 13
13 -
 14
14 -
 15
15 -
16
-
17
-
18
-
19
-
20
-
21
-
22
-
23
-
24
-
25
-
26
-
27
-
28
-
29
-
30
-
31
-
32
-
33
-
34
-
35
-
36
 |
 |
