Makita XJP03Z Makita XJP03 Instruction Manual - Page 6
Adjusting the depth of groove, Angle guide, Fence
 |
View all Makita XJP03Z manuals
Add to My Manuals
Save this manual to your list of manuals |
Page 6 highlights
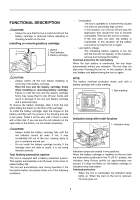
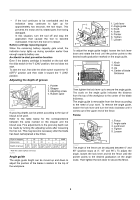
− If the tool continues to be overloaded and the indication lamp continues to light up for approximately two seconds, the tool stops. This prevents the motor and its related parts from being damaged. In this situation, turn the tool off and stop the application that caused the tool to become overloaded. Then turn the tool on to restart. Battery cartridge replacing signal When the remaining battery capacity gets small, the indication lamp lights up during operation earlier than enough capacity battery use. Accidental re-start preventive function Even if the battery cartridge is installed on the tool with the slide switch in the "I (ON)" position, the tool does not start. To start the tool, first slide the slide switch toward the "O (OFF)" position and then slide it toward the "I (ON)" position. Adjusting the depth of groove 1. Pointer 1 2. Stopper 3. Adjusting screw 4. Rubber spike 3 2 4 014907 6 grooving depths can be preset according to the size of biscuit to be used. Refer to the table below for the correspondence between the sizes marked on the stopper and the biscuit size. Fine adjustments to the grooving depth can be made by turning the adjusting screw after loosening the hex nut. This may become necessary after the blade has been resharpened a few times. Size on stopper Biscuit size Depth of groove 0 0 8 mm (0.3") 10 20 S D MAX 10 20 - - - 10 mm 12.3mm 13 mm 14.7mm 20 mm* (0.4") (0.48") (0.51") (0.58") (0.8") * With the rubber spikes removed. 012683 Angle guide The angle guide height can be moved up and down to adjust the position of the blade in relation to the top of the workpiece. 1 6 5 7 1. Lock lever 2. Angle guide 3. Knob 4. Scale 5. Pointer 6. Tighten 7. Loosen 23 4 014896 To adjust the angle guide height, loosen the lock lever down and rotate the knob until the pointer points to the desired scale graduation marked on the angle guide. 1. Knob 1 2. Down 3. Up 2 4. Center of blade thickness 3 4 012498 Then tighten the lock lever up to secure the angle guide. The scale on the angle guide indicates the distance from the top of the workpiece to the center of the blade thickness. The angle guide is removable from the fence according to the need of your work. To remove the angle guide, loosen the lock lever and turn the knob clockwise until it comes out of the upper end of the fence. Fence 1 5 4 1. Fence 2. Angle scale 3. Lock lever 4. Tighten 5. Loosen 23 014897 The angle of the fence can be adjusted between 0° and 90° (positive stops at 0°, 45° and 90°). To adjust the angle, loosen the lock lever and tilt the fence until the pointer points to the desired graduation on the angle scale. Then tighten the lock lever to secure the fence. 6
-
 1
1 -
 2
2 -
 3
3 -
 4
4 -
 5
5 -
 6
6 -
 7
7 -
 8
8 -
 9
9 -
 10
10 -
 11
11 -
 12
12 -
13
-
14
-
15
-
16
-
17
-
18
-
19
-
20
-
21
-
22
-
23
-
24
-
25
-
26
-
27
-
28
-
29
-
30
-
31
-
32
-
33
-
34
-
35
-
36
 |
 |
