Makita XJP03Z Makita XJP03 Instruction Manual - Page 7
Assembly
 |
View all Makita XJP03Z manuals
Add to My Manuals
Save this manual to your list of manuals |
Page 7 highlights
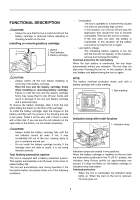
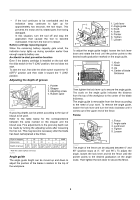
1 2 3 10mm 1. Lock lever 2. Pointer 1 3. Angle scale 4. Center of blade thickness 5. Blade cover 1. Slide switch 10mm 4 5 014898 When the fence is set at 90°, both the distance from the center of the blade thickness to the fence and the distance from the center of the blade thickness to the bottom of the blade cover are 10 mm (0.4"). NOTE: • Remove the angle guide according to the need of your work when using the tool with the angle of the fence adjusted to other than 0 ゚. When you need to use the angle guide under the above condition, be sure to adjust the depth of groove to get a proper depth. Set plate 2 5: 4mm 3 4 10mm 10mm 6mm 6 012258 1 1 1. Lock lever 2. Pointer 3. Angle scale 4. Set plate 5. Thickness of set plate 6. Center of blade 7 thickness 7. Blade cover 1. Set plate 014899 Use the set plate as shown in the figures when cutting slots in thin workpieces. Switch action 014908 To start the tool, slide the slide switch toward the "I (ON)" position. For continuous operation, press the front of the slide switch to lock it. To stop the tool, press the rear of the slide switch, then slide it toward the "O (OFF)" position. ASSEMBLY CAUTION: • Always be sure that the tool is switched off and the battery cartridge is removed before carrying out any work on the tool. Removing or installing the blade 6 5 7 8 1. Lock nut 1 2 2. Plate joiner 3 blade 3. Blade cover 4 4. Inner flange 5. Clamp screw 6. Shaft lock 7. Loosen 8. Tighten 014909 CAUTION: • When installing the plate joiner blade, mount the inner flange with the side marked "22" facing toward you. To remove the blade, loosen the clamp screw and open the blade cover. Push the shaft lock and loosen the lock nut using the lock nut wrench. To install the blade, first mount the inner flange. Then mount the blade and the lock nut. Securely tighten the lock nut using the lock nut wrench. Close the blade cover and tighten the clamp screw to secure the blade cover. CAUTION: • Before installing the battery cartridge into the tool, always check to see that the slide switch actuates properly and returns to the "OFF" position when the rear of the slide switch is depressed. • Switch can be locked in "ON" position for ease of operator comfort during extended use. Apply caution when locking tool in "ON" position and maintain firm grasp on tool. CAUTION: • Use only Makita lock nut wrench provided to remove or install the blade. • Always check the depth of groove after replacing the blade. Readjust it if necessary. 7
-
 1
1 -
 2
2 -
 3
3 -
 4
4 -
 5
5 -
 6
6 -
 7
7 -
 8
8 -
 9
9 -
 10
10 -
 11
11 -
 12
12 -
13
-
14
-
15
-
16
-
17
-
18
-
19
-
20
-
21
-
22
-
23
-
24
-
25
-
26
-
27
-
28
-
29
-
30
-
31
-
32
-
33
-
34
-
35
-
36
 |
 |
