Marantz SA-11S3 SA11S3U_ENG_UG_v00 - Page 14
Remote control connection, Connecting the power cord, PC connection
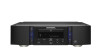 |
View all Marantz SA-11S3 manuals
Add to My Manuals
Save this manual to your list of manuals |
Page 14 highlights
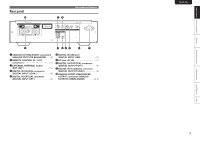
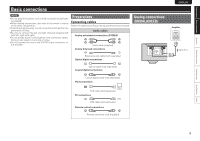
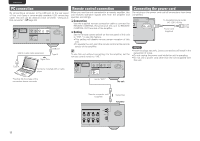
ENGLISH PC connection By connecting a computer to the USB port on the rear panel of this unit using a commercially available USB connecting cable, this unit can be used as a D/A converter "Using as a D/A converter" (vpage 20). "CLASS 1 L LASER PRODUCT" L COAX. OPT. DIGITAL OUTPUT REMOTE CONTROL IN EXT. INT. OUT COAX. OPT. USB DIGITAL INPUT AC IN USB 2.0 cable (sold separately) USB port Type B Signal flow Remote control connection When you use this unit connected to a marantz amplifier, this unit receives operation signals sent from the amplifier and operates accordingly. nnConnection Use the supplied remote connection cable to connect the REMOTE CONTROL IN terminal of this unit to REMOTE CONTROL OUT terminal of the amplifier. nnSetting Set the remote control switch on the rear panel of this unit to "EXT." to use this feature. • This setting will disable remote sensor reception of this unit. • To operate the unit, point the remote control at the remote sensor of the amplifier. To use this unit without connecting it to the amplifier, set the remote control switch to "INT.". Connecting the power cord Do not plug in the power cord until all connections have been completed. AC IN USB To household power outlet (AC 120 V, 60 Hz) Power cord (supplied) NOTE • Insert the plugs securely. Loose connections will result in the generation of noise. • Do not unplug the power cord while the unit is operating. • Do not use a power cord other than the cord supplied with this unit. Type A Computer installed with a media player "CLASS 1 L LASER PRODUCT" L COAX. OPT. DIGITAL OUTPUT REMOTE CONTROL IN EXT. INT. OUT COAX. OPT. USB DIGITAL INPUT AC IN Plug that fits the shape of the connection device connector Set to "EXT." The unit Remote connector cord (supplied) Signal flow Amplifier 11
-
 1
1 -
2
-
3
-
4
-
5
-
6
-
7
-
8
-
 9
9 -
 10
10 -
 11
11 -
 12
12 -
 13
13 -
 14
14 -
 15
15 -
 16
16 -
 17
17 -
 18
18 -
 19
19 -
20
-
21
-
22
-
23
-
24
-
25
-
26
-
27
-
28
-
29
-
30
-
31
-
32
-
33
-
34
 |
 |
