Marantz SR-19EX Marantz AV Receiver IR Remote Code List - Page 13
Front, Panel, Features
 |
View all Marantz SR-19EX manuals
Add to My Manuals
Save this manual to your list of manuals |
Page 13 highlights
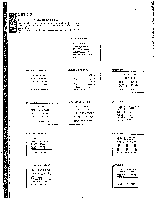
FRONT PANEL FEATURES (SEE PAGE 1) C) POWER switch and STANDBY indicator You can turn on and off the unit's power using the front panel power switch. However, if you turn the unit off with the front panel switch, the unit goes completely off rather than to the "standby mode" (red LED indicator light glows in the standby mode). The unit cannot be turned on with the remote control when it is not in the standby mode. When the red LED is on, the unit can be turned on via the remote control or by pressing any input selector button on the front panel. © PHONES jack for stereo headphones Conventional dynamic headphones can be plugged in here. Notes: When the headphones plug is inserted, the surround mode is switched automatically to STEREO and the sound from the speakers is muted. The surround mode returns to the previous mode as soon as the plug is removed from the jack. 0 Surround MODE buttons (AUTO, DOLBY, THX, DTS, HALL, MATRIX, MOVIE, STEREO/MONO ) Selects the surround modes. When these buttons are pressed, the SURROUND mode is changed. ® A/D (ANALOG/DIGITAL) selector button In case that you select the input source which is linked with any digital input, if you desire to switch to analog input temporarily, you can switch by pressing A/D key. Note: This key is not effective for an input source which is not linked with any digital input. 0 ATT (Attenuate) button Press this button to attenuate the analog AUDIO signal selected with the FUNCTION buttons. When the analog input signal is too great and the voice distorts even by throttling the SR-19 VOLUME control, turn on the function. "ATT" is displayed when this function is activated. The signal-input level is reduced by about half. The attenuate function will not have any effect on signals being output by the "REC OUT(TAPE, CD-R/MD,VCR1 and DSSNCR2)" rear panel jacks. This function is memorized for each input function. © BAND (Tuner Band Selector) button Press this button to switch between FM mode and AM mode of the tuner. Tuner band is changed in the following sequence. FM AM -4 FM 07 FMFM MODE button Press this button to select the auto stereo mode or mono mode when the FM band is selected. The AUTO indicator lights in the auto stereo mode. ® MEMO (memory) button Press this button to enter the tuner preset memory numbers and station names. 0 CL (Clear ) button Press this button to cancel the station-memory setting mode or preset scan tuning. to D. ( Digital ) COPY button Press this button for digital dubbing to the CD-R recorder or MD deck. When this button is pressed, the digital source of the DIGITAL OUTPUT is switched in the following sequence. SOURCE --+DIG.1 --+DIG.2 DIG.4 --> OFF tt TAPE COPY button Press this button for audio dubbing to the tape deck. When this button is pressed, the source of the TAPE OUT is switched in the following sequence. SOURCE ---+TUNER ►CD CD-R/MD © S. ( SOURCE ) DIRECT button Press this button to make higher quality Hi-Fi sounds. When this button is pressed, the signals are transmitted by bypassing the tone control circuitry so that they can be reproduced with higher quality. Notes: The surround mode is switched automatically to STEREO when the source direct function is turned on. The source direct function is available with a digital source when the input signal is the PCM. If a Dolby Digital signal or DTS signal input to SR-19, in this mode output from SR-19 will be muted. O VCR1 COPY button Press this button for video and audio dubbing to the VCR1 deck. When this button is pressed, the source of the VCR1 OUT is switched in the following sequence. SOURCE --)• TV - 4. LD DVD --+ DSSNCR2 g BASS and TREBLE tone controls These controls are used to boost or cut high and low frequencies. TREBLE: Adjusts the tone of high-frequency sound. BASS: Adjusts the tone of low-frequency sound. Notes: These buttons are unavailable in THX CINEMA mode. The frequency is flat by pressing the up and down keys simultaneously. • AUX input jacks These auxiliary video/audio input jacks accept the connection of a camcorder, portable VCR, etc. To make proper connections, refer to the owner's manuals of the auxiliary components. 8 VOLUME control knob Adjusts the overall sound level. Turning the control clockwise increases the sound level. O AUTO TUNING button When this button is pressed and the GYRO TUNING knob is turned quickly, the frequency is scanned while turning the GYRO TUNING knob. The Auto scan function starts when the GYRO TUNING knob is slopped. CO PRESET button Press this button to display the preset number. The preset number is changed by turning the GYRO TUNING knob. 0 MULTI (Multi Room) button Press this button to switch the unit to multi room mode. "MULTI ROOM" appears in the display.
-
 1
1 -
2
-
3
-
4
-
5
-
6
-
7
-
 8
8 -
 9
9 -
 10
10 -
 11
11 -
 12
12 -
 13
13 -
 14
14 -
 15
15 -
 16
16 -
 17
17 -
 18
18 -
19
-
20
-
21
-
22
-
23
-
24
-
25
-
26
-
27
-
28
-
29
-
30
-
31
-
32
-
33
-
34
-
35
-
36
-
37
-
38
-
39
-
40
-
41
-
42
-
43
 |
 |
