Marantz SR7400 SR7400 User Guide - Page 13
Setting The Time, General Information Of Rc1400, To Sr7400
 |
View all Marantz SR7400 manuals
Add to My Manuals
Save this manual to your list of manuals |
Page 13 highlights
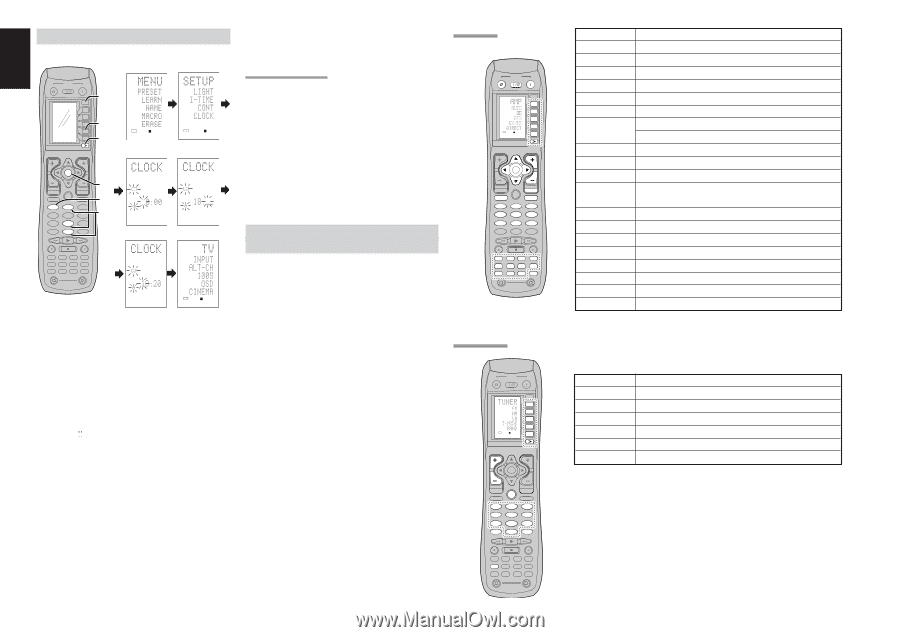
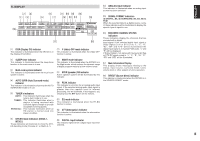
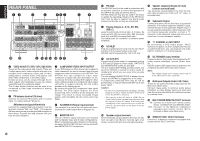
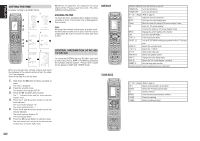
ENGLISH SETTING THE TIME Example: Setting to 6:20PM (18:20) 1 2 POWER OFF ON/OFF SOURCE ON M D1 D2 D3 D4 D5 3. 3. 2. CH VOL USE PAGE 1 3 USE PAGE 1 2 4 OK PREV MENU TEST 1 7.1CH 4 DISP 7 CLEAR GUIDE CH.SEL 2 ATT 5 OSD 8 0 MUTE EXIT SURR 3 SPK-AB 6 SLEEP 9 MEMO 6. 4. 5. LEARN 5 LEARN 6 TV DVD VCR DSS TUNER CD CD-R MD TAPE 1 AUX1 AUX2 LIGHT RC1400 Learning Remote Controller AMP 2 LEARN USE PAGE 1 2 Whenever the batteries are replaced, the clock shows 00:00. Please reset the clock. (The time setting is not backed up.) AMP MODE CHECKING THE TIME To check the time, hold down the > button for three seconds or more. The current time is displayed for five seconds. Note Although the remote control uses a quartz clock, the time may become out of sync over the course of operation. Be sure to correct the clock from time to time. POWER OFF ON/OFF SOURCE USE PAGE 1 2 3 4 ON M D D11 D2 D3 D4 D5 CH VOL OK GENERAL INFORMATION OF RC1400 TO SR7400 To control the SR7400 by your RC1400, you have to select the device AMP or TUNER by pressing the function selector button. Please refer below for the details in AMP and TUNER mode. PREV MENU TEST 1 7.1CH 4 DISP 7 CLEAR GUIDE CH.SEL 2 ATT 5 OSD 8 0 MUTE EXIT SURR 3 SPK-AB 6 SLEEP 9 MEMO TV DVD VCR DSS TUNER CD CD-R MD TAPE 1 AUX1 AUX2 LIGHT RC1400 Learning Remote Controller AMP 2 When you bought this remote control and insert the batteries to the remote control at first, the steps 1 to 3 are skipped. Starts from step 4 to set the time. 1. Hold down the M button for three seconds or more. The menu is displayed. 2. Press the > button once. This displays second page (SETUP). 3. Press the D4 (CLOCK) direct button. The " " indicator blinks and the clock indicator displays "0:00". 4. Press the 1 and 8 numeric button to set the hour indicator. The hour indicator displays "18". The minute indicator blinks "_". 5. Press the 2 and 0 numeric button to set the minute indicator. The minute indicator displays "20". The hour indicator blinks. 6. Press the OK cursor button to start the clock. The clock starts from 0 second at the time that was set and return to normal (USE) mode. 10 TUNER MODE POWER OFF ON/OFF SOURCE USE PAGE 1 ON M D D11 D2 D3 D4 D5 CH VOL OK PREV MENU TEST 1 7.1CH 4 DISP 7 CLEAR GUIDE CH.SEL 2 ATT 5 OSD 8 0 MUTE EXIT SURR 3 SPK-AB 6 SLEEP 9 MEMO TV DVD VCR DSS TUNER CD CD-R MD TAPE 1 AUX1 AUX2 LIGHT RC1400 Learning Remote Controller AMP 2 SOURCE ON/OFF Turns the SR7400 on and off POWER ON Turns the SR7400 on POWER OFF Turns the SR7400 off D1 - D5 / >(Page) (Refer to page vi) VOL +/- Adjust the over all sound level MUTE Decreases the sound temporarily Cursor Move the cursor for setting in"On screen display" mode OK Enter the "On screen display" Confirms the setting in "On screen display" mode MENU Displays the current setting on the monitor EXIT Exits from SETUP MENU TEST (1) Enter the test tone menu CH.SEL (2) Call up SETUP MENU and adjusts speaker levels or 7.1ch input level SURR (3) Selects the surround mode 7.1CH (4) Selects the 7.1CH IN ATT (5) Reduces the input level SPK-AB (6) Selects the speaker system DISP (7) Changes the front display mode OSD (8) Selects the "On screen display" on and off SLEEP (9) Sets the sleep timer function Function selector Selects a particular source component D1 - D5 / >(Page) (Refer to page vi) CH +/- Selects a preset station up and down GUIDE Selects the "Frequency direct input" 0-9 Input the numeric MEMO Enter the tuner preset memory numbers CLEAR Clears the inputting TUNER Selects a frequency band
-
 1
1 -
2
-
3
-
4
-
5
-
6
-
7
-
 8
8 -
 9
9 -
 10
10 -
 11
11 -
 12
12 -
 13
13 -
 14
14 -
 15
15 -
 16
16 -
 17
17 -
 18
18 -
19
-
20
-
21
-
22
-
23
-
24
-
25
-
26
-
27
-
28
-
29
-
30
-
31
-
32
-
33
-
34
-
35
-
36
-
37
-
38
-
39
-
40
-
41
-
42
-
43
-
44
-
45
-
46
-
47
-
48
-
49
-
50
-
51
-
52
 |
 |