Maytag MEDC400VW Installation Instructions - Page 12
Plan Vent System - bottom vent kit
 |
UPC - 883049145723
View all Maytag MEDC400VW manuals
Add to My Manuals
Save this manual to your list of manuals |
Page 12 highlights
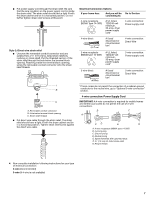
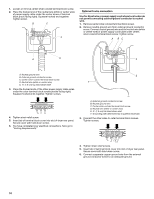
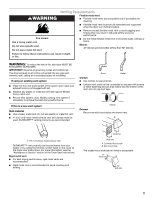
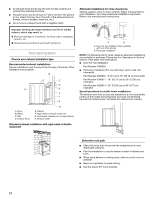
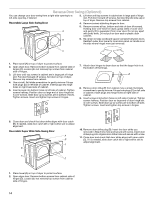
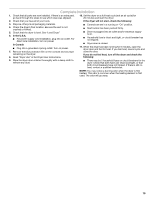
■ An exhaust hood should cap the vent to keep rodents and insects from entering the home. ■ Exhaust hood must be at least 12" (30.5 cm) from the ground or any object that may be in the path of the exhaust (such as flowers, rocks or bushes, snow line, etc.). ■ Do not use an exhaust hood with a magnetic latch. Alternate installations for close clearances Venting systems come in many varieties. Select the type best for your installation. Two close-clearance installations are shown. Refer to the manufacturer's instructions. Improper venting can cause moisture and lint to collect indoors, which may result in: Moisture damage to woodwork, furniture, paint, wallpaper, carpets, etc. Housecleaning problems and health problems. Plan Vent System Choose your exhaust installation type Recommended exhaust installations Typical installations vent the dryer from the rear of the dryer. Other installations are possible. B C D A E F G B A. Dryer B. Elbow C. Wall D. Exhaust hood H E. Clamps F. Rigid metal or flexible metal vent G. Vent length necessary to connect elbows H. Exhaust outlet Standard exhaust installation with rigid metal or flexible metal vent A B A. Over-the-top installation (also available with one offset elbow) B. Periscope installation NOTE: The following kits for close clearance alternate installations are available for purchase. Please see the "Assistance or Service" section of the Dryer User Instructions. ■ Over-the-Top Installation: Part Number 4396028 ■ Periscope Installation (For use with dryer vent to wall vent mismatch): Part Number 4396037 - 0" (0 cm) to 18" (45.72 cm) mismatch Part Number 4396011 - 18" (45.72 cm) to 29" (73.66 cm) mismatch Part Number 4396014 - 29" (73.66 cm) to 50" (127 cm) mismatch Special provisions for mobile home installations The exhaust vent must be securely fastened to a noncombustible portion of the mobile home structure and must not terminate beneath the mobile home. Terminate the exhaust vent outside. Determine vent path ■ Select the route that will provide the straightest and most direct path outdoors. ■ Plan the installation to use the fewest number of elbows and turns. ■ When using elbows or making turns, allow as much room as possible. ■ Bend vent gradually to avoid kinking. ■ Use the fewest 90° turns possible. 12
-
 1
1 -
2
-
3
-
4
-
5
-
6
-
 7
7 -
 8
8 -
 9
9 -
 10
10 -
 11
11 -
 12
12 -
 13
13 -
 14
14 -
 15
15 -
 16
16 -
 17
17 -
18
-
19
-
20
-
21
-
22
-
23
-
24
 |
 |
