Maytag MER5551BAB Use and Care Manual - Page 7
Oven Cooking - 30
 |
View all Maytag MER5551BAB manuals
Add to My Manuals
Save this manual to your list of manuals |
Page 7 highlights
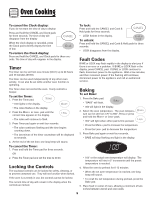
Oven Cooking Manual Clean Oven Control (select models) A B C D E F NOTE: The display will show 12:00 when the appliance is first connected to power or if power is interrupted. The Bake and Broil indicators light when function is pressed. A Bake B Broil C Timer D Clock E CANCEL F More+ or Less- Use for baking and roasting. Use for broiling and top browning. Sets Timer. Use to set time-of-day clock. Cancels all operations except Timer and Clock. Enters or changes time, oven temperature. Sets HI or LO broil. Using the Touchpads • Press the desired pad. • Press the More+ or Less- pad to enter time or temperature. • A beep will sound each time a function pad is pressed. There is no beep for the More+ or Less- pad. • A double beep will sound if a programming error occurs. Note: Four seconds after pressing the More+ or Lesspad, the time or temperature will automatically be entered. If more than 30 seconds elapse between touching a function pad and the More+ or Less- pad, the function will be canceled and the display will return to the previous display. Setting the Clock 1. Press the Clock pad. • The clock time cannot be set if the control is programmed for a bake, broil or timing operation. 2. Set the correct time of day using the More+ or Less- pads. If the More+ or Less- pad is not pressed within 30 seconds, the program will cancel. Press the Clock pad and begin again. Setting the Timer The timer can be set from one minute (:01) up to 99 hours and 59 minutes (99:59). Time will be displayed in minutes and not in seconds. THE TIMER DOES NOT CONTROL THE OVEN. 1. Press the Timer pad. • 0:00 will light and the colon (:) will flash in the display. 2. Press the More+ or Less- pad until the desired time is displayed. • The timer will begin as soon as the time is set. • The flashing colon indicates that a timing operation is in progress. (The colon will not flash if the time of day or oven temperature is displayed.) • Two short beeps signal the end of the operation. "0:00" will appear in the display. • If desired, press the Clock pad and the time of day will briefly reappear in the display during a timing operation. • If desired, press the Bake or Broil pads and the current temperature setting will briefly reappear in the display during a timing operation. To cancel the timer operation: Press and hold the Timer pad for several seconds. 6
-
 1
1 -
 2
2 -
 3
3 -
 4
4 -
 5
5 -
 6
6 -
 7
7 -
 8
8 -
 9
9 -
 10
10 -
 11
11 -
 12
12 -
13
-
14
-
15
-
16
-
17
-
18
-
19
-
20
-
21
-
22
-
23
-
24
-
25
-
26
-
27
-
28
-
29
-
30
-
31
-
32
-
33
-
34
-
35
-
36
-
37
-
38
-
39
-
40
-
41
-
42
-
43
-
44
-
45
-
46
-
47
-
48
-
49
-
50
-
51
-
52
-
53
-
54
-
55
-
56
-
57
-
58
-
59
-
60
-
61
-
62
-
63
-
64
-
65
-
66
-
67
-
68
-
69
-
70
-
71
-
72
-
73
-
74
-
75
-
76
-
77
-
78
-
79
-
80
 |
 |
