Meade LX200-ACF 12 inch User Manual - Page 6
Press 0 to Align or Mode for Menu displays.
 |
View all Meade LX200-ACF 12 inch manuals
Add to My Manuals
Save this manual to your list of manuals |
Page 6 highlights
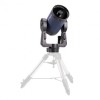
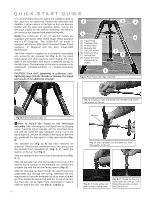
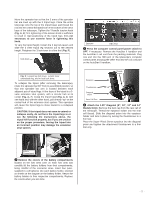
OR ấ ẩẪ ᕤ4.1 Attach the Microfocuser (Optional Accessory - standard on 16" model only): Remove the dust cap from the rear cell port (A) of the telescope (Note: Telescope not shown for clarity). Thread the microfocuser adapter (B) into the rear cell port thread. Slide the microfocuser (C) over the microfocuser adapter and tighten the three hex screws on the microfocuser (K) using the provided hex keys. 1.25" Diagonal Prism Users: If using the 1.25" diagonal prism (G), slide the 1.25" adapter (D) into the microfocuser. Line up the thumbscrew into the groove in the microfocuser (I, also see Fig. 4a and 4b, page 14). Slide the 1.25" diagonal prism into the adapter (D). Tighten the adapter thumbscrew (H) to a firm feel only. Tighten the microfocuser thumbscrews (I) to a firm feel only. 2.0" Diagonal Mirror Users: If using the 2.0" diagonal mirror, slide the mirror directly into the microfocuser (C). Tighten the microfocuser thumbscrews (I) to a firm feel only. Display ᕦ Press the Power Switch on the computer control panel to the ON position. The copyright message lights on AutoStar II's LCD display. Slew Speeds: Speed 9: Fast . . Speed 5: Medium . . Speed 1: Slow Arrow Keys Speed Key Number Keys ᕧ "Press 0 to Align or Mode for Menu" displays. You can use the Arrow keys to slew (move) the telescope up, down, right, or left. To change the telescope's slew speed, press the Speed key and then the Number keys. "9" is the fastest speed and "1" is the slowest speed. See page 18 for more details. Or you can Press "0" to begin Automatic Alignment. See page 19 for more information. R.A. Lock Dec. Lock ᕥ Tighten, to a firm feel only, the R.A. and Dec. locks. Remove the dust cover from the end of the telescope tube. Sight along the side of the telescope's main tube to locate an object. Rotate the mirror lock knob (Fig. 1, 9) towards the "Unlock" position, until it feels loose-the telescope is shipped with the mirror locked. Use the telescope's coarse focus knob (Fig. 1, 6) to bring the object into focus. -6-
-
 1
1 -
 2
2 -
 3
3 -
 4
4 -
 5
5 -
 6
6 -
 7
7 -
 8
8 -
 9
9 -
 10
10 -
 11
11 -
 12
12 -
13
-
14
-
15
-
16
-
17
-
18
-
19
-
20
-
21
-
22
-
23
-
24
-
25
-
26
-
27
-
28
-
29
-
30
-
31
-
32
-
33
-
34
-
35
-
36
-
37
-
38
-
39
-
40
-
41
-
42
-
43
-
44
-
45
-
46
-
47
-
48
-
49
-
50
-
51
-
52
-
53
-
54
-
55
-
56
-
57
-
58
-
59
-
60
-
61
-
62
-
63
-
64
-
65
-
66
-
67
-
68
-
69
-
70
-
71
-
72
-
73
-
74
-
75
-
76
 |
 |
