Meade LX200-ACF 12 inch User Manual - Page 9
&
 |
View all Meade LX200-ACF 12 inch manuals
Add to My Manuals
Save this manual to your list of manuals |
Page 9 highlights
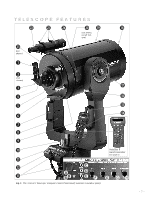
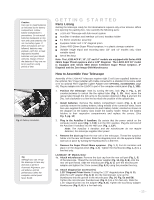
Definitions Throughout this manual, you will notice the terms "Alt/Az", "Right Ascension", and "Declination". Alt/Az or more properly, altazimuth, is frequently used to refer to altitude or Declination (the up-and-down vertical movement of the telescope) and azimuth or Right Ascension (the side-to-side horizontal movement of the telescope). Right Ascension is abbreviated as "R.A." and Declination as "Dec.". Important Note: After the telescope is aligned (see page 18), the Dec. slow motion control 1^ may be used and the telescope will remain in alignment. However, if the R.A. slow motion control 1) is used after the telescope has been aligned, alignment will be lost and the telescope will need to be realigned. Caution: When loosening the Dec. lock, be sure to support the optical tube (Fig. 1, 19). The weight of the tube could cause the tube to swing through the fork arms suddenly. 2! Want to learn more about mounting and adjusting the viewfinder? See page 16. 1# Computer Control Panel (see Fig. 1 inset): A. ON/OFF Switch: Turns the computer control panel and AutoStar II ON or OFF. The red power indicator LED next to the switch illuminates when power is supplied to the AutoStar II handbox, the microfocuser, and to the telescope's motor drives (the LED can be turned off in the Panel Light menu; see page 28). B. 12vDC Power Connector: Provides a connection so that the telescope assembly may be powered from a standard 115v AC home outlet using the optional #547 Power Adapter with Cable or the optional 12v DC #607 Cigarette Lighter Adapter. See OPTIONAL ACCESSORIES, page 44. C. Focus Port: Plug the optional microfocuser into this port. Control the microfocuser through the AutoStar II menus. See HOT BUTTON MENUS, page 32. D. Reticle Port: Plug the optional reticle eyepiece into this port. Control the reticle through the AutoStar II menus. See HOT BUTTON MENUS page 32. Also see OPTIONAL ACCESSORIES, page 44. Note: See the instruction sheets that are included with the focuser, the reticle, and the autoguider for more details. E. 12vDC Output: Use the 12vDC output to power telescope accessories. F. Handbox (HBX) Port: Plug the AutoStar II coil cord into this port. G. RS232 Ports (2): Provides connection with a PC and for current and future Meade accessories. Your PC can control your LX200-ACF telescope using serial commands. Go to the Meade website (www.meade.com) to download the latest serial commands and device pinouts. H. Autoguider Port: Plug the optional autoguider into this port. See the instruction sheet that came with your autoguider for more information. 1$ Tiltable AutoStar II Holder: Attach to fork handles (see 1% below). Holds your handbox in a convenient location. 1% Fork Handles: Use to lift optical tube assembly or to rotate the telescope when attached to the tripod. 1^ Declination (Dec.) Slow-Motion Control: Make fine adjustments in Declination (altitude) by turning this control with the Dec. Lock (see 1& below) in the locked position. In order for this control to operate properly, power must be off. 1& Dec. Lock: Controls the manual vertical movement of the telescope. Turning the Dec. lock counterclockwise unlocks the telescope enabling it to be freely rotated by hand about the vertical axis. Turning the Dec. lock clockwise (to a firm feel only) prevents the telescope from being moved manually, but engages the vertical motor drive for AutoStar II operation. 1* Dust Cover: Gently pry the dust cover from the front lens of the telescope. Note: The dust cover should be replaced after each observing session and the power turned off to the telescope. Verify that any dew that might have collected during the observing session has evaporated prior to replacing the dust cover. 1( Optical Tube: The main optical component that gathers the light from distant objects and brings this light to a focus for examination through the eyepiece. 2) Declination (Dec.) Setting Circle (on left fork arm): See APPENDIX A, page 53, for detailed information. 2! Viewfinder Collimation Screws: Use these six screws to adjust the alignment of the viewfinder. 2@ 8 x 50mm Viewfinder: A low-power, wide-field sighting scope with crosshairs that enables easy centering of objects in the telescope eyepiece. 2# GPS Receiver (see page 22 for photo): Receives information transmitted from Global Positioning System satellites. See pages 19, 20, and 22 for more information. 2$ Tube Adapters: The optical and mechanical axes of the LX200-ACF telescope have been carefully aligned at the factory to ensure accurate object pointing. Do not loosen or remove the optical tube assembly from the tube adapters. The resulting misalignment of the axes will result in inaccurate slewing of the telescope in the GO TO mode. -9-
-
 1
1 -
2
-
3
-
 4
4 -
 5
5 -
 6
6 -
 7
7 -
 8
8 -
 9
9 -
 10
10 -
 11
11 -
 12
12 -
 13
13 -
 14
14 -
15
-
16
-
17
-
18
-
19
-
20
-
21
-
22
-
23
-
24
-
25
-
26
-
27
-
28
-
29
-
30
-
31
-
32
-
33
-
34
-
35
-
36
-
37
-
38
-
39
-
40
-
41
-
42
-
43
-
44
-
45
-
46
-
47
-
48
-
49
-
50
-
51
-
52
-
53
-
54
-
55
-
56
-
57
-
58
-
59
-
60
-
61
-
62
-
63
-
64
-
65
-
66
-
67
-
68
-
69
-
70
-
71
-
72
-
73
-
74
-
75
-
76
 |
 |