Memorex MDF0153 User Guide - Page 6
Getting Started Continued
 |
UPC - 961613073624
View all Memorex MDF0153 manuals
Add to My Manuals
Save this manual to your list of manuals |
Page 6 highlights
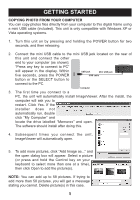
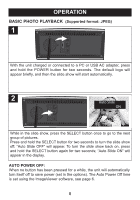
GETTING STARTED (CONTINUED) 6. To delete a picture, select it and then click Delete. 7. To delete all pictures, click Clear. 8. To rotate a picture, select it, then click Rotate. 9. To edit a picture (only pictures added can be edited), select it and then click Edit. Click and drag a portion of the picture as desired. The picture may not fit the screen (128 x 128 pixels). It depends the portion you click & drop. 10. When editing the picture, click Smooth Edit to smooth out the picture. Click Lock Style and the selection will default to a perfect square. This will allow you to take a portion of the picture and make it fit exactly into this frame's screen. Click Auto Stretch so the picture will stretch to fit the display. After selecting the box, click on the picture at the left of the window to see the effect. 11. Set Auto Power Off Time (the time the unit will stay on before turning off if no button is pressed) in the Auto Time Power Off (Min.) box. Set to "0" and the unit will stay on until turned off using the POWER button. Note: Auto Power Off function will not work during playback of the slide show. 12. Click Exit to exit the ImageViewer or click Save to save the new pictures and settings to the player. If Exit is selected before saving the pictures, the pictures and settings will not be saved. 13. When finished saving and exiting the ImageViewer, you can follow the "Safely Remove Hardware" procedure as shown on the next page. NOTE: When the photos are loaded into the unit, they will appear at the original ratio. This means there may be black bars at the sides or top of the picture. 6
-
 1
1 -
 2
2 -
 3
3 -
 4
4 -
 5
5 -
 6
6 -
 7
7 -
 8
8 -
 9
9 -
 10
10 -
 11
11
 |
 |