Memorex MKS8590 User Guide - Page 18
Using The Record And Record Sync Features - manual
 |
UPC - 749720007769
View all Memorex MKS8590 manuals
Add to My Manuals
Save this manual to your list of manuals |
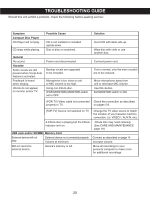
Page 18 highlights
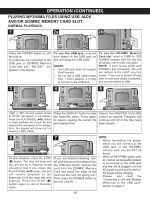
OPERATION (CONTINUED) USING THE RECORD AND RECORD SYNC FEATURES 1 2 First connect and prepare the device(s) you want recorded (CD/CD+G, microphone(s), guitar and/or keyboard) as previously instructed. Then, connect and prepare the device that you want to record to (player connected to the USB jack or SD/MMC memory card) as previously instructed. To manually record, press the REC button; "REC" will appear in the display. The recorded file will be stored in the folder "LIVE_REC" with the name "LIVE001.MP3", LIVE002.MP3", up to "LIVE999.MP3". To synchronize recording, press the REC SYNC button; "REC" will blink and "SYNC" will appear in the display. Once any of the devices-CD/CD+G, mic(s), guitar and/or keyboard-are used, recording will automatically start and "REC" will stop blinking. The recorded file will be stored in the folder "LIVE_REC" with the name "LIVE001.MP3", LIVE002.MP3", up to "LIVE999.MP3". NOTES: • To stop recording (either method), press the STOP (I) button and wait for the display to show the total number of tracks. It may take a few minutes to finish the recorded file if the recording time is long. • While recording, do not remove the player connected to the USB jack or the SD/MMC memory card from the unit. Otherwise, all files inside the storage device may be damaged. • While recording, press the DISPLAY button to view the remaining time in the display. Press again to resume viewing the elapsed time. • The display will show "USB FULL" if the USB memory is full, "SD FULL" if the SD/MMC memory is full or "TRK FULL" if there is a recorded file "LIVE999.MP3" stored in the player connected to the USB jack or the SD/MMC memory card. • When the USB-SD/MMC display shows "TRK FULL", please move all recordings to your personal computer to make room for additional recordings. CONNECTING A UNIT WITH MULTIPLE MEMORIES TO THE USB JACK: If you connect a player to the USB jack with both internal memory and a SD/MMC memory card, press and hold the DIR + button for three seconds; the unit will read the SD/MMC memory card and the display will show "USB 02". If you connect a unit with multiple memories to the USB jack (i.e., a unit with a card reader which has different cards [CF, memory stick, SD/MMC memory card, etc.]), press and hold the DIR + button again for three seconds; the unit will read the other card and the display will show "USB 03". This unit can read up to nine memories via the USB jack (including the internal memory), but the sequence of the card reading is controlled by the card reader. To select the different cards inside the card reader, press the DIR + or DIR - button. If the unit connected to the USB jack has an internal memory, it will be defaulted as "USB 01". 17
-
 1
1 -
2
-
3
-
4
-
5
-
6
-
7
-
8
-
9
-
10
-
11
-
12
-
 13
13 -
 14
14 -
 15
15 -
 16
16 -
 17
17 -
 18
18 -
 19
19 -
 20
20 -
 21
21 -
 22
22 -
 23
23
 |
 |
