Metabo W 1080-115 Operating Instructions 2 - Page 16
Cleaning, Troubleshooting, WE 1450, Accessories, Repairs
 |
View all Metabo W 1080-115 manuals
Add to My Manuals
Save this manual to your list of manuals |
Page 16 highlights
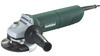
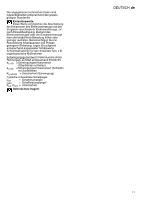
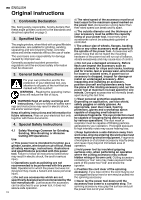
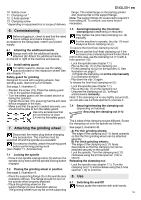
en ENGLISH Switch on first, then guide the accessory towards the workpiece. The machine must not be allowed to draw in additional dust and shavings. When switching the machine on and off, keep it away from dust deposits. After switching off the machine, only place it down when the motor has come to a standstill. Avoid inadvertent starts: always switch the tool off when the plug is removed from the mains socket or if there has been a power cut. In continuous operation, the machine continues running if it is forced out of your hands. Therefore, always hold the machine with both hands using the handles provided, stand in a safe position and concentrate. Machines with slide switch: 6 Always work against the run of the disc (see illustration). Otherwise there is the danger of the machine kicking back from the cut out of control. Guide the machine evenly at a speed suitable for the material being processed. Do not tilt, apply excessive force or sway from side to side. Sanding: Press down the machine evenly on the surface and move back and forth so that the surface of the workpiece does not become too hot. Wire brushing: Press down the machine evenly. 9. Cleaning Motor cleaning: blow compressed air through the rear ventilation slots of the machine regularly, frequently and thoroughly. Here, the machine must be held firmly. I 0 Switching on: Push the slide switch (6) forward. For continuous activation, now tilt downwards until it engages. Switching off: Press the rear end of the slide switch (6) and release. Machines with Paddle Switch (with dead man function): 78 Switching the angle grinder ON just for a moment: Switching on: Press in the lock (7) and then press the trigger switch (8). Let go of the lock (7). Switching off: Release the trigger switch (8). Continuous operation (depends on machine features): Switching on: Press in the lock (7) and hold in place. Press and hold the trigger switch (8). The machine is now switched on. Now press in the lock (7) a second time to lock the trigger switch (8) in position (continuous operation). Switching off: Press and release the trigger switch (8). 10. Troubleshooting (WE 1450) Restart protection: The machine does not start. The restart protection is active. If the mains plug is inserted with the machine switched on, or if the current supply is restored following an interruption, the machine does not start up. Switch the machine off and on again. 11. Accessories Use only genuine Metabo accessories. See page 4. Use only accessories which fulfil the requirements and specifications listed in these operating instructions. A Safety guard for cut-off grinding Designed for work with cut-off wheels, diamond cut-off wheels. Install as described under "Safety guard for grinding" (chapter 6.2). B Hand guard for sanding and wire brushing operations Designed for work with support plates, sanding pads, wire brushes. Install hand guard under the additional sidemounted handle. C Adjusting nut (11) D Clamping nut (tool-free) (2) For a complete range of accessories, see www.metabo.com or the accessories catalogue. 8.2 Working instructions Grinding: Press down the machine evenly on the surface and move back and forth so that the surface of the workpiece does not become too hot. Roughing: position the machine at an angle of 30° - 40° for the best working results. Separating: 16 12. Repairs Repairs to electrical tools must be carried out by qualified electricians ONLY! Contact your local Metabo representative if you have Metabo power tools requiring repairs. For addresses see www.metabo.com.
-
 1
1 -
2
-
3
-
4
-
5
-
6
-
7
-
8
-
9
-
10
-
 11
11 -
 12
12 -
 13
13 -
 14
14 -
 15
15 -
 16
16 -
 17
17 -
 18
18 -
 19
19 -
 20
20 -
 21
21 -
22
-
23
-
24
-
25
-
26
-
27
-
28
-
29
-
30
-
31
-
32
-
33
-
34
-
35
-
36
-
37
-
38
-
39
-
40
-
41
-
42
-
43
-
44
-
45
-
46
-
47
-
48
-
49
-
50
-
51
-
52
-
53
-
54
-
55
-
56
-
57
-
58
-
59
-
60
-
61
-
62
-
63
-
64
-
65
-
66
-
67
-
68
-
69
-
70
-
71
-
72
-
73
-
74
-
75
-
76
-
77
-
78
-
79
-
80
-
81
-
82
-
83
-
84
-
85
-
86
-
87
-
88
-
89
-
90
-
91
-
92
-
93
-
94
-
95
-
96
-
97
-
98
-
99
-
100
-
101
-
102
-
103
-
104
 |
 |