Miele K 1911 Vi Operating and Installation manual - Page 58
Attaching and aligning the custom door front 58, the distance to doors of adjacent
 |
View all Miele K 1911 Vi manuals
Add to My Manuals
Save this manual to your list of manuals |
Page 58 highlights
Installing the appliance Attaching and aligning the custom door front ^ Align the custom door height with the threaded bolts p. ^ Now tighten the nuts q on top. This secures the appliance door. ^ Open the door and hang the custom door with the mounting frame over the threaded bolts p. ^ Put the side strips o back into place and screw them completely down on both sides of the appliance door. Bag E contains spare screws for this purpose. ^ Screw the nuts q a few turns onto the threaded bolts p. Do not tighten the nuts completely. ^ Close the appliance door and check the distance to doors of adjacent furniture/fixtures. 58
-
 1
1 -
2
-
3
-
4
-
5
-
6
-
7
-
8
-
9
-
10
-
11
-
12
-
13
-
14
-
15
-
16
-
17
-
18
-
19
-
20
-
21
-
22
-
23
-
24
-
25
-
26
-
27
-
28
-
29
-
30
-
31
-
32
-
33
-
34
-
35
-
36
-
37
-
38
-
39
-
40
-
41
-
42
-
43
-
44
-
45
-
46
-
47
-
48
-
49
-
50
-
51
-
52
-
 53
53 -
 54
54 -
 55
55 -
 56
56 -
 57
57 -
 58
58 -
 59
59 -
 60
60 -
 61
61 -
 62
62 -
 63
63 -
64
-
65
-
66
-
67
-
68
 |
 |

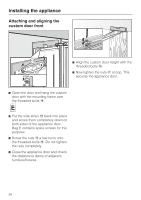
Attaching and aligning the
custom door front
^
Open the door and hang the custom
door with the mounting frame over
the threaded bolts
p
.
^
Put the side strips
o
back into place
and screw them completely down on
both sides of the appliance door.
Bag E contains spare screws for this
purpose.
^
Screw the nuts
q
a few turns onto
the threaded bolts
p
. Do not tighten
the nuts completely.
^
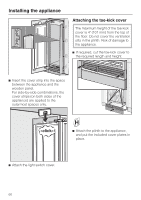
Close the appliance door and check
the distance to doors of adjacent
furniture/fixtures.
^
Align the custom door height with the
threaded bolts
p
.
^
Now tighten the nuts
q
on top. This
secures the appliance door.
Installing the appliance
58