Motorola MA580 User Guide - Page 28
Installing the Phone on the Wall, The wall mount works best with a wall mount bracket
 |
UPC - 612572111116
View all Motorola MA580 manuals
Add to My Manuals
Save this manual to your list of manuals |
Page 28 highlights
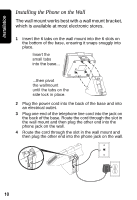
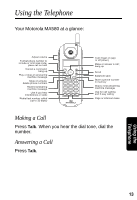
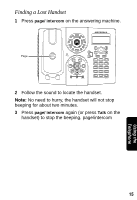
Installation Installing the Phone on the Wall The wall mount works best with a wall mount bracket, which is available at most electronic stores. 1 Insert the 6 tabs on the wall mount into the 6 slots on the bottom of the base, ensuring it snaps snuggly into place. Insert the small tabs into the base... ...then pivot the wallmount until the tabs on the side lock in place. 2 Plug the power cord into the back of the base and into an electrical outlet. 3 Plug one end of the telephone line cord into the jack on the back of the base. Route the cord through the slot in the wall mount and then plug the other end into the phone jack on the wall. 4 Route the cord through the slot in the wall mount and then plug the other end into the phone jack on the wall. 10
-
 1
1 -
2
-
3
-
4
-
5
-
6
-
7
-
8
-
9
-
10
-
11
-
12
-
13
-
14
-
15
-
16
-
17
-
18
-
19
-
20
-
21
-
22
-
 23
23 -
 24
24 -
 25
25 -
 26
26 -
 27
27 -
 28
28 -
 29
29 -
 30
30 -
 31
31 -
 32
32 -
 33
33 -
34
-
35
-
36
-
37
-
38
-
39
-
40
-
41
-
42
-
43
-
44
-
45
-
46
-
47
-
48
-
49
-
50
-
51
-
52
-
53
 |
 |
