Motorola NTN8496 User Manual - Page 10
Attaching and Charging the Battery
 |
View all Motorola NTN8496 manuals
Add to My Manuals
Save this manual to your list of manuals |
Page 10 highlights
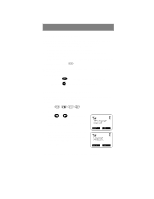
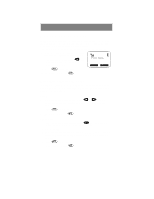
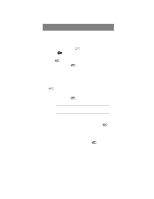
i500plus User's Guide Attaching and Charging the Battery Attaching the Battery 1. Release the lock located at the bottom of the battery door by pressing up on the latch, and remove the door. 2 ++ 1 ++ 2. Insert the battery with the "+" and "-" at the top, per the figure. Install the battery bottom first, then press down on the battery to secure it. 3. Replace the battery cover and lock by pressing down on the latch. Detaching the Battery 1. Release the battery door by sliding the battery door latch upward. 2. Remove the battery door housing and remove the battery from the phone. Charging the Battery with the Standard Travel Charger Attach the Charger to the i500plus via the Side Charging Jack, and plug the Charger into an electrical outlet. For more information about Chargers, see "Accessories" on page 37. To get the maximum use from the battery, charge it overnight before you use it for the first time. See Table 1 for battery charging status. Battery and Charging Status A low battery is indicated by a short, chirp-like sound through the speaker. The battery strength indicator icon shows the remaining charge in your battery. Three bars indicate full charge. As the charge is reduced through use, the bars disappear. The indicator flashes when you have less than five minutes of talk time. Table 1: Battery Charging Status Charging Discharging Icon Flashes Low Battery Low Battery 0-30% 0-10% 31-60% 11-40% 61-90% 41-70% 91-100% 71-100% 4
-
 1
1 -
2
-
3
-
4
-
 5
5 -
 6
6 -
 7
7 -
 8
8 -
 9
9 -
 10
10 -
 11
11 -
 12
12 -
 13
13 -
 14
14 -
 15
15 -
16
-
17
-
18
-
19
-
20
-
21
-
22
-
23
-
24
-
25
-
26
-
27
-
28
-
29
-
30
-
31
-
32
-
33
-
34
-
35
-
36
-
37
-
38
-
39
-
40
-
41
-
42
-
43
-
44
-
45
-
46
-
47
-
48
-
49
-
50
-
51
-
52
-
53
-
54
-
55
-
56
-
57
-
58
-
59
-
60
-
61
 |
 |
