NEC 2010x User Manual - Page 29
assembly. S.4
 |
View all NEC 2010x manuals
Add to My Manuals
Save this manual to your list of manuals |
Page 29 highlights
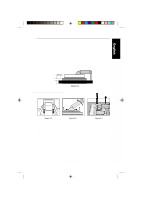
English Deutsch Français Installation E - 14 Return the stand to its original position, remove the 4 screws that connect the monitor to the stand, and lift off the stand assembly. (Figure S.4) 5. Reverse this process to reattach stand. NOTE: Use only VESA-compatible alternative mounting method. 55mm Figure S.1 4 3 1 2 Figure S.2 Figure S.3 Figure S.4 Caution: To fulfil the safety requirements the monitor must be mounted to an arm which guaranties the necessary stability under consideration of the weight of the monitor. The LCD monitor shall only be used with an approved arm (e.g. GS mark). Español Italiano Appendix CN971B/LCD2010X/7A812101 29 00.8.30, 2:21 PM
-
 1
1 -
2
-
3
-
4
-
5
-
6
-
7
-
8
-
9
-
10
-
11
-
12
-
13
-
14
-
15
-
16
-
17
-
18
-
19
-
20
-
21
-
22
-
23
-
 24
24 -
 25
25 -
 26
26 -
 27
27 -
 28
28 -
 29
29 -
 30
30 -
 31
31 -
 32
32 -
 33
33 -
 34
34 -
35
-
36
-
37
-
38
-
39
 |
 |

Appendix
Español
Français
Deutsch
English
Italiano
Installation
E - 14
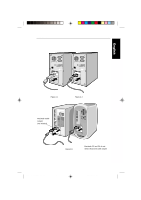
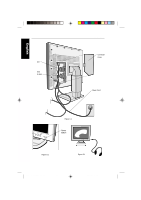
Return the stand to its original position, remove the 4 screws
that connect the monitor to the stand, and lift off the stand
assembly. (Figure S.4)
5.
Reverse this process to reattach stand.
NOTE:
Use only VESA-compatible alternative mounting method.
55mm
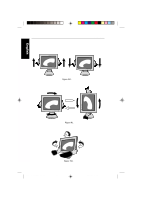
Figure S.1
1
2
3
4
Figure S.4
Figure S.3
Figure S.2
Caution:
To fulfil the safety requirements the monitor must be mounted
to an arm which guaranties the necessary stability under consideration
of the weight of the monitor.
The LCD monitor shall only be used with an approved arm (e.g. GS mark).
CN971B/LCD2010X/7A812101
00.8.30, 2:21 PM
29