NEC 60XM5 User Manual - Page 30
Option3 Settings Menu
 |
UPC - 050927253072
View all NEC 60XM5 manuals
Add to My Manuals
Save this manual to your list of manuals |
Page 30 highlights
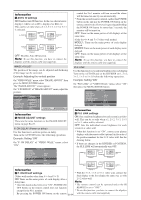
Setting the picture size for RGB input signals Use this procedure to switch the setting to "ON" or "OFF". * This function is available only for 50 and 60 inch types. Example: Setting the "PICTURE SIZE" mode to "OFF" On "PICTURE SIZE" of "OPTION2" menu, select "OFF". OPTION 2 PREVIOUS PAGE PWR. MGT. : OFF CINEMA MODE : ON LONG LIFE GRAY LEVEL : 3 S1/S2 : OFF PICTURE SIZE : OFF DVI SET UP PROTOCOL SET : OFF NEXT PAGE SEL. ADJ. EXIT RETURN 2 / 4 Setting the signal and black level for DVI signal Choose the signal for the DVI connector (PC or STB/ DVD) and set the black level. Example: Setting the "PLUG/PLAY" mode to "STB/ DVD" On "OPTION2" menu, select "DVI SET UP", then press the MENU/ENTER button. The "DVI SET UP" screen appears. On "PLUG/PLAY" of "DVI SET UP" menu, select "STB/ DVD". DVI SET UP P L U G / P L AY : STB/DVD BLACK LEVEL : HIGH SEL. ADJ. EXIT RETURN Option3 Settings Menu Set "ADVANCED OSM" to "ON" in the MAIN MENU. Using the timer This function sets the day of the week and time. You can also set the program timer which turns on or off the power at the day of the week, time and the input mode you want, or repeat timer which displays two input modes alternately. On "OPTION3" menu, select "TIMER", then press the MENU/ENTER button. The "TIMER" screen appears. TIMER PRESENT TIME TIMER : OFF SEL. MENU/ENTER OK EXIT RETURN PRESENT TIME This sets the day of the week and present time. Example: Setting "WEDNESDAY", "22:05" On "TIMER" menu, select "PRESENT TIME", then press the MENU/ENTER button. The "PRESENT TIME" screen appears. Adjust the items. PRESENT TIME RETURN SUMMER TIME : OFF SET SEL. W E D N E S D AY 22 : 05 : 00 ADJ. EXIT RETURN Information Ⅵ PLUG/PLAY settings PC: When connected to the PC signal. BLACK LEVEL is set to "LOW" automatically. STB/DVD: When connected to the SET TOP BOX, DVD etc. BLACK LEVEL is set to "HIGH" automatically. Ⅵ BLACK LEVEL settings LOW: When connected to the PC signal. HIGH: When connected to the SET TOP BOX, DVD etc. Change "HIGH" into "LOW" if the black level appears gray. Setting the Protocol set Use this setting when connecting a device which uses special protocol for RS-232C communication. Example: Setting "ON" On "PROTOCOL SET" of "OPTION2" menu, select "ON". OPTION 2 PREVIOUS PAGE PWR. MGT. : OFF CINEMA MODE : ON LONG LIFE GRAY LEVEL : 3 S1/S2 : OFF PICTURE SIZE : ON DVI SET UP PROTOCOL SET : ON NEXT PAGE SEL. ADJ. EXIT RETURN 2 / 4 Select "SET", then press the MENU/ENTER button. The adjustments are stored and the TIMER menu reappears. * If you press the EXIT button instead of the MENU/ENTER button, the settings can not be made. PRESENT TIME RETURN SUMMER TIME : OFF SET SEL. W E D N E S D AY 22 : 05 : 00 MENU/ENTER OK EXIT RETURN Information Ⅵ PRESENT TIME settings SUMMER TIME: Use to set SUMMER TIME. ON: The present time + 1 hour. OFF: Cancelled Day: Set the day of the week (e.g. Sunday). Hour: Set the hour in the 24-hour format (range 00 to 23). Minutes: Set the minutes (range 00 to 59). Information Ⅵ PROTOCOL SET settings ON: When special protocol is used. OFF: When NEC protocol is used (normal). * Consult your dealer for details of protocol. En-29
-
 1
1 -
2
-
3
-
4
-
5
-
6
-
7
-
8
-
9
-
10
-
11
-
12
-
13
-
14
-
15
-
16
-
17
-
18
-
19
-
20
-
21
-
22
-
23
-
24
-
 25
25 -
 26
26 -
 27
27 -
 28
28 -
 29
29 -
 30
30 -
 31
31 -
 32
32 -
 33
33 -
 34
34 -
 35
35 -
36
-
37
-
38
-
39
-
40
-
41
-
42
-
43
-
44
-
45
-
46
-
47
-
48
 |
 |
