NEC MM2000B MM2000B : MM2000B User Manual - Page 20
Connecting to the Image Input Terminals
 |
View all NEC MM2000B manuals
Add to My Manuals
Save this manual to your list of manuals |
Page 20 highlights
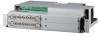
2. Installation 2-3. Connecting to the Image Input Terminals This Switcher has two interface boards, MM-VIDEO and MM-RGB as standard equipment. See page 7. Connect required video signals. Four interface boards can be inserted in the Switcher at the same time. See page 13. COMPONENT MM2000 Ferrite clamp core (supplied) BNC x 5 cable (not supplied) RCA(female)-to-BNC(male) adapter (not supplied) Component video RCA x 3 cable (not supplied) PC Mounting the ferrite clamp core Use the supplied ferrite clamp core. DVD player 1 Open the accessory ferrite clamp core and attach it to the cable. When doing so, attach this as close as possible to end that goes to the switcher. * Push the catch to open the ferrite clamp core. 2 Close the ferrite clamp core tightly. 3 Fix the supplied band to the cable as a stopper. * Pull the end of the band to tighten it. Cut off the surplus of the band. 12 Band
-
 1
1 -
2
-
3
-
4
-
5
-
6
-
7
-
8
-
9
-
10
-
11
-
12
-
13
-
14
-
 15
15 -
 16
16 -
 17
17 -
 18
18 -
 19
19 -
 20
20 -
 21
21 -
 22
22 -
 23
23 -
 24
24 -
 25
25 -
26
-
27
-
28
-
29
-
30
-
31
-
32
-
33
-
34
-
35
-
36
-
37
-
38
-
39
-
40
 |
 |
