NEC PX-50XM1A 50MP1 - Page 13
Battery Installation and Replacement
 |
View all NEC PX-50XM1A manuals
Add to My Manuals
Save this manual to your list of manuals |
Page 13 highlights
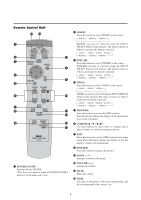
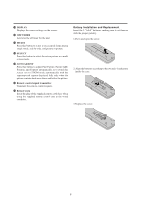
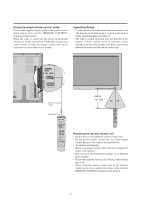
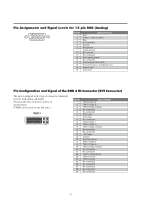
!3 DISPLAY Displays the source settings on the screen. !4 OFF TIMER Activates the off timer for the unit. !5 MULTI Press this button to select a screen mode from among single mode, side by side, and picture in picture. !6 SELECT Press this button to select the active picture in a multi screen mode. !7 AUTO ADJUST Press this button to adjust Fine Picture, Picture ADJ, Position, and Contrast automatically, or to switch the screen size to ZOOM mode automatically with the superimposed caption displayed fully only when the picture contains dark areas above and below the picture. !8 Remote control signal transmitter Transmits the remote control signals. !9 Remote Jack Insert the plug of the supplied remote cable here when using the supplied remote control unit in the wired condition. Battery Installation and Replacement Insert the 2 "AAA" batteries, making sure to set them in with the proper polarity. 1.Press and open the cover. 2. Align the batteries according to the (+) and (-) indication inside the case. 3.Replace the cover. 6
-
 1
1 -
2
-
3
-
4
-
5
-
6
-
7
-
 8
8 -
 9
9 -
 10
10 -
 11
11 -
 12
12 -
 13
13 -
 14
14 -
 15
15 -
 16
16 -
 17
17 -
 18
18 -
19
-
20
-
21
-
22
-
23
-
24
-
25
-
26
-
27
-
28
-
29
-
30
-
31
-
32
-
33
-
34
-
35
-
36
-
37
-
38
-
39
-
40
-
41
-
42
-
43
-
44
-
45
-
46
-
47
-
48
-
49
-
50
-
51
-
52
-
53
-
54
-
55
-
56
-
57
-
58
-
59
-
60
 |
 |
