NEC PX-50XM3A 42VP4/42XM2/50XM3/61XM2 - Page 41
VIDEO1, 2, 3, RGB1, 2, 3, HD/DVD1, 2, Example: Setting ON, Example: Setting OFF
 |
View all NEC PX-50XM3A manuals
Add to My Manuals
Save this manual to your list of manuals |
Page 41 highlights
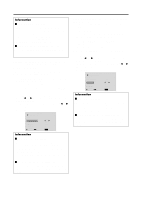
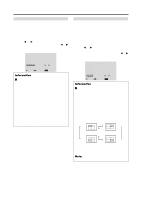
Information Ⅵ PWR. ON MODE settings LAST Last mode (the mode that was last selected at the time the power was switched off). VIDEO1, 2, 3 .... VIDEO input mode. RGB1, 2, 3 ....... RGB input mode. HD/DVD1, 2 ..... HD/DVD input mode. Ⅵ Restoring the factory default settings Select "ALL RESET" under the OPTION1 menu. Note that this also restores other settings to the factory defaults. Enabling/disabling the front panel controls This function enables/disables the front panel controls. Example: Setting "ON" Set "ADVANCED OSM" to "ON" in the main menu (1/ 2), then perform the following operations. 1. On the MAIN MENU, select "OPTION3", then press the MENU/ENTER button. The "OPTION3" screen appears. 2. Use the v and w buttons to select "CONTROL LOCK". 3. To set the CONTROL LOCK to "ON"... Use the ᮤ and ᮣ buttons to select "ON", then press the MENU/ENTER button. The mode switches as follows each time the ᮤ or ᮣ button is pressed: OFF ↔ ON OPTION3 3 / 3 PREVIOUS PAGE TIMER PWR. ON MODE : LAST CONTROL LOCK : ON IR REMOTE : ON LOOP OUT : OFF ID NUMBER : ALL VIDEO WALL SEL. ADJ. EXIT RETURN Information Ⅵ CONTROL LOCK settings ON ...... Disables the buttons on the front panel. OFF .... Enables the buttons on the front panel. * Even when the CONTROL LOCK is set, the POWER switch will not be locked. * This becomes effective when the on-screen menu goes out. Ⅵ Restoring the factory default settings Select "ALL RESET" under the OPTION1 menu. Note that this also restores other settings to the factory defaults. Enabling/disabling remote control wireless transmission This function enables/disables remote control wireless transmission. Example: Setting "OFF" Set "ADVANCED OSM" to "ON" in the main menu (1/ 2), then perform the following operations. 1. On the MAIN MENU, select "OPTION3", then press the MENU/ENTER button. The "OPTION3" screen appears. 2. Use the v and w buttons to select "IR REMOTE". 3. To set the IR REMOTE to "OFF"... Use the ᮤ and ᮣ buttons to select "OFF", then press the MENU/ENTER button. The mode switches as follows each time the ᮤ or ᮣ button is pressed: OFF ↔ ON OPTION3 3 / 3 PREVIOUS PAGE TIMER PWR. ON MODE : LAST CONTROL LOCK : OFF IR REMOTE : OFF LOOP OUT : OFF ID NUMBER : ALL VIDEO WALL SEL. ADJ. EXIT RETURN Information Ⅵ IR REMOTE settings ON ...... Enables remote control wireless transmission. OFF .... Disables remote control wireless transmission. Set "OFF" to avoid unwanted control from other remote controls. Ⅵ Restoring the factory default settings Select "ALL RESET" under the OPTION1 menu. Note that this also restores other settings to the factory defaults. 34
-
 1
1 -
2
-
3
-
4
-
5
-
6
-
7
-
8
-
9
-
10
-
11
-
12
-
13
-
14
-
15
-
16
-
17
-
18
-
19
-
20
-
21
-
22
-
23
-
24
-
25
-
26
-
27
-
28
-
29
-
30
-
31
-
32
-
33
-
34
-
35
-
 36
36 -
 37
37 -
 38
38 -
 39
39 -
 40
40 -
 41
41 -
 42
42 -
 43
43 -
 44
44 -
 45
45 -
 46
46 -
47
-
48
-
49
-
50
-
51
-
52
 |
 |
