Nady U-800 Manual - Page 13
Audio Mute On/off Switch 40
 |
View all Nady U-800 manuals
Add to My Manuals
Save this manual to your list of manuals |
Page 13 highlights
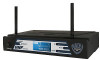
To preserve battery life, turn the transmitter off when not in use. To turn the transmitter off, slide the POWER ON/OFF (42) switch to the OFF position. The BATTERY STATUS LED (41) is not lit up, indicating the unit is off. The MUTE ICON (6) on receiver should be on, muting the audio out. At power off the transmitter will store the last settings entered and re-display them at the next power on. The default factory setting is Group 11, Channel 01. For optimum performance, an INPUT VOLUME LEVEL (43) is provided (for LT/ HM input mode operation only). Adjust the gain by turning the control with a small screwdriver. It is recommended that the level be set at about 1/2 maximum. Experiment and set for maximum possible gain without audible distortion on the high level peaks. (Note: Turning down the gain too much can compromise the signal-to-noise and it is not recommended.) The microphone is now ready to use. The diversity A or B INDICATORS (9) on the U-800 receiver should now be lit, indicating a received signal from the transmitter. When ready to speak, slide the AUDIO MUTE ON/OFF SWITCH (40) to the ON position. The MUTE ICON (6) on receiver should be off. Adjust the volume of the receiver as per the Audio Output Microphone Connection section of the above U-800 receiver instructions. Note: The transmitter has a removable ANTENNA (38). For best operating range, it should be attached (screwed on tightly counterclockwise, or exchange with another type.). For best transmitting power during use, make sure it is not blocked. For optimum range maintain line-of-sight (no obstructions) between the transmitter and the receiver whenever possible. A walk test before use will determine the operating range in your application. Note: Observe care in selecting P.A. volume, transmitter location and speaker placement so that acoustic feedback (howling or screeching) will be avoided. Operating the UB-800 Transmitter The POWER ON/OFF SWITCH (42) and the AUDIO MUTE ON/OFF SWITCH (41) switches have two positions for power ON/OFF and audio mute ON/Standby respectively. During normal operation with the unit powered on standby, slide the RF POWER (35) switch to the ON position. You will feel a slight click indicating the ON position is selected. The receiver's RF INDICATOR (8) and diversity A/B INDICATOR (9) should now be on, indicating a received RF signal from the transmitter. When ready to transmit audio, slide the AUDIO MUTE (36) to ON to un-mute. To mute, slide the switch to OFF again. Adjust the volume of the receiver per the previous section, Connecting the Audio Output. Note: Avoid acoustic feedback (howling or screeching) by taking care in selecting PA volume, transmitter location and speaker placement. 13
-
 1
1 -
2
-
3
-
4
-
5
-
6
-
7
-
 8
8 -
 9
9 -
 10
10 -
 11
11 -
 12
12 -
 13
13 -
 14
14 -
 15
15 -
 16
16 -
 17
17 -
 18
18 -
19
-
20
-
21
-
22
-
23
-
24
 |
 |
