Nady W-1KU Manual - Page 10
Setting up the Transmitter, Powering the Transmitter On/Off, Programming the HT-1KU, to the Selected - instrument wireless system
 |
View all Nady W-1KU manuals
Add to My Manuals
Save this manual to your list of manuals |
Page 10 highlights
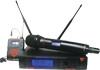
At maximum receiver volume setting, as indicated by the Volume display, the system output is approximately +4dB higher than a direct cord-to-amp connection. Note: As when making any connection, make sure the amplifier or mixing board volume is at the minimum level before plugging in the receiver to avoid possible sound system damage. Your W-1KU receiver is now operational and ready to use. Once you have completed the above steps, proceed to the following instructions for the HT-1KU Handheld or BT-1KU Instrument transmitter included with your system. Note: Only one transmitter can be used with one receiver. It is not possible to use two transmitters on the same frequency and mix the output of these transmitters into one wireless receiver. HT‑1KU Handheld Microphone Transmitter Setting up the Transmitter The HT-1KU requires two AA size batteries to operate. To install the batteries onto the battery compartment, unscrew the Battery Compartment Cover (22) by turning counterclockwise until loose and slide down the cover, exposing the Battery Compartment (31). Insert two fresh AA batteries according to the correct polarity as indicated on the transmitter body. Screw the battery cover back onto the microphone, making sure it is securely tightened. Fresh alkaline batteries can provide up to 8-10 hours of operation, but in order to ensure optimum performance it is recommended that the batteries be replaced after 6-8 hours of use or as indicated to be necessary by the flashing Battery (40) icon. Powering the Transmitter On/Off To turn on the transmitter, slide the power On/Off Switch (28) to the on position. The LCD backlight will light up, indicating the unit is now on. After ten seconds the backlight will automatically turn off to conserve battery life. The Group/Channel/Battery (24) indicator icons stay on for normal operation. As many of the LCD battery levels should stay lit as possible, as they indicate usable battery strength. As the batteries weaken fewer of the level indicators will stay lit until only one bar shows, which will then flash to warn that the batteries are now too low and should be replaced as soon as possible with fresh ones. To preserve battery life, turn the transmitter off when not in use. To turn the transmitter off, slide the power on/off switch to the off position. No LCD or backlight is lit up and the unit will be off. Programming the HT-1KU to the Selected Channel The transmitter can be programmed to the same frequency as selected for the receiver, either via automatic synchronization using the IR Sync function or manually on the transmitter itself. IR Sync Programming: Use the wireless IR LED Receptor Sensor (30) to download pre‑programmed channels from the receiver (see Selecting the W-1KU Receiver Volume Level/Group/Channel and Selecting the HT-1KU Transmitter Group and Channel). Start programming by holding the IR LED Receptor Sensor about 6"-12" from the receiver, then press the IR Sync Button (11) on the receiver. The red IR LED (10) on the receiver will flash once after one second indicating IR data transfer, and then once more at three seconds, indicating that the IR transmission is over. Upon successful data transfer (usually in less than two seconds) the transmitter's backlight will light up and the transmitter will transmit 10
-
 1
1 -
2
-
3
-
4
-
 5
5 -
 6
6 -
 7
7 -
 8
8 -
 9
9 -
 10
10 -
 11
11 -
 12
12 -
 13
13 -
 14
14 -
 15
15 -
16
-
17
-
18
-
19
-
20
 |
 |
