Netgear EX6200 User Manual - Page 60
Manage a WiFi Access List, Keep Existing Wireless Settings, Settings, Apply
 |
View all Netgear EX6200 manuals
Add to My Manuals
Save this manual to your list of manuals |
Page 60 highlights
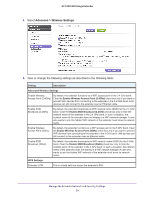
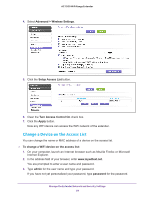
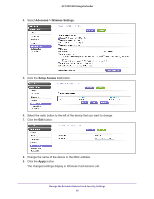
AC1200 WiFi Range Extender Setting Description Enable Device's PIN By default, the Enable Device's PIN check box is selected and the extender's PIN is enabled. For enhanced security, you can disable the extender's PIN by clearing the Enable Device's PIN check box. However, when you disable the extender's PIN, WPS is not disabled because you can still use the physical WPS button. Note: The PIN function might temporarily be disabled when the router detects suspicious attempts to break into the router's WiFi settings by using the router's PIN through WPS. Prevent PIN compromise By default, automatic disabling of the PIN is turned on, and the PIN is disabled after three failed PIN connections. In this situation, the WPS LED blinks slowly. When you restart the extender, the PIN is reenabled. To turn off automatic disabling of the PIN, clear the check box below the Enable Device's PIN check box. You can change this setting only when the PIN is enabled. To change the number of times that a PIN connection is allowed to fail, enter a number in the field. You can change this number only when the PIN is enabled. Keep Existing Wireless By default, the settings on the Wireless Settings screen remain the same when Settings (2.4GHz b/g/n) you use WPS to establish a WiFi connection in the 2.4 GHz band. Clear the Keep Existing Wireless Settings (2.4GHz b/g/n) check box only if you want to allow the WPS process to change the SSID and passphrase for access in the 2.4 GHz band on the Wireless Settings screen. Keep Existing Wireless Settings (5GHz a/n/ac) By default, the settings on the Wireless Settings screen remain the same when you use WPS to establish a WiFi connection in the 5 GHz band. Clear the Keep Existing Wireless Settings (5GHz a/n/ac) check box only if you want to allow the WPS process to change the SSID and passphrase for access in the 5 GHz band on the Wireless Settings screen. Note: If you clear a Keep Existing Wireless Settings check box and use WPS to add a computer or WiFi device to the extender's network, the SSID and passphrase are automatically generated and other devices that are already connected to the extender's network might be disconnected. You can view the SSID and passphrase on the Wireless Settings screen (see Manage the Extender WiFi Settings on page 49). NETGEAR recommends that you keep the Keep Existing Wireless Settings check boxes selected. 6. Click the Apply button. Your changes are saved. Manage a WiFi Access List By default, any WiFi device that is configured with the correct network name (SSID) can access the WiFi network of the extender. For increased security, you can restrict access to the WiFi network of the extender to allow only specific WiFi devices based on their MAC addresses. Devices that are not on the access list cannot join the WiFi network of the extender. Manage the Extender Network and Security Settings 60
-
 1
1 -
2
-
3
-
4
-
5
-
6
-
7
-
8
-
9
-
10
-
11
-
12
-
13
-
14
-
15
-
16
-
17
-
18
-
19
-
20
-
21
-
22
-
23
-
24
-
25
-
26
-
27
-
28
-
29
-
30
-
31
-
32
-
33
-
34
-
35
-
36
-
37
-
38
-
39
-
40
-
41
-
42
-
43
-
44
-
45
-
46
-
47
-
48
-
49
-
50
-
51
-
52
-
53
-
54
-
 55
55 -
 56
56 -
 57
57 -
 58
58 -
 59
59 -
 60
60 -
 61
61 -
 62
62 -
 63
63 -
 64
64 -
 65
65 -
66
-
67
-
68
-
69
-
70
-
71
-
72
-
73
-
74
-
75
-
76
-
77
-
78
-
79
-
80
-
81
-
82
-
83
-
84
-
85
-
86
-
87
-
88
-
89
-
90
-
91
-
92
-
93
-
94
-
95
-
96
-
97
-
98
-
99
-
100
-
101
-
102
-
103
-
104
-
105
-
106
-
107
-
108
-
109
-
110
-
111
-
112
-
113
-
114
-
115
-
116
-
117
-
118
-
119
-
120
-
121
-
122
-
123
-
124
 |
 |