Netgear GSM5212P GSM5212P/GSM7212P/GSM7212F/GSM7224P Hardware Installation Gui - Page 18
Connecting a Console to the Switch, VT100/ANSI terminal, or a Windows PC, Apple Macintosh PC - drivers
 |
View all Netgear GSM5212P manuals
Add to My Manuals
Save this manual to your list of manuals |
Page 18 highlights
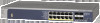
NETGEAR Managed Switch Connecting a Console to the Switch After you install the switch and apply power, you can connect to it with a terminal or workstation. You can use the Command Line Interface (CLI) to identify the IP address. To use a console you need the following items: • VT100/ANSI terminal, or a Windows PC, Apple Macintosh PC, or UNIX workstation. • USB console cable (shipped with the product) or a Null-modem cable with 9-pin connectors on each end. To connect a console to the switch: 1. Connect the null-modem cable to the console port on the rear of the switch or connect the USB console cable to the console USB port on the front of the switch. Front Panel Console Port Rear Panel Console Port Figure 10. Console Ports 2. Select console port via the console slide switch on the front panel: a. Select the mini USB (cable included) as console port by pushing the slide switch to the left. Use the Resource CD to install the USB driver on your PC. b. Select the DB9 (cable not included) in the back as console port by pushing the slide switch to the right. 3. Connect the other end of the cable to a workstation or terminal. 4. If you attached a workstation, start a terminal-emulation program. • Microsoft Windows users can use HyperTerminal if it comes with the Windows operating systems. If not, you need to install another 3rd party terminal emulator such as Tera Term. • Macintosh users can use ZTerm. • UNIX users can use a terminal emulator such as TIP. 5. Configure the terminal-emulation program to use the following settings: • Baud rate: 115,200 bps • Data bits: 8 • Parity: none • Stop bit: 1 • Flow control: none Hardware Installation 18
-
 1
1 -
2
-
3
-
4
-
5
-
6
-
7
-
8
-
9
-
10
-
11
-
12
-
 13
13 -
 14
14 -
 15
15 -
 16
16 -
 17
17 -
 18
18 -
 19
19 -
 20
20 -
 21
21 -
 22
22 -
 23
23 -
24
-
25
-
26
-
27
-
28
 |
 |
