Netgear PS101v2 PS101v2 Installation Guide - Page 7
Advanced Settings - print server
 |
View all Netgear PS101v2 manuals
Add to My Manuals
Save this manual to your list of manuals |
Page 7 highlights
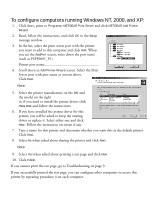
Note: The PS101 Print Server, by default, automatically obtains an IP address from the network. However, NETGEAR recommends you use a fixed IP address to be able to use a Web browser to print a test page or to make configuration changes later. For a home or small office, use IP address information compatible with your router setup. The IP address for the print server needs to be unique in the network. If you don't know what to use, you may click Suggest New Values to get a useable IP address. If you are using a NETGEAR router with default settings, the following settings should work: IP address: 192.168.0.150 (The first three numbers should match the numbers for the network device. Make sure the last 3 digits are unique on your network.) Subnet mask: 255.255.255.0 Gateway IP address: 192.168.0.1 (the address of your router) 3. When complete, click Finish. 4. When asked if you want to set up a printer right away, click Yes and continue to procedure 4: Confirgure a Computer To Access the Print Server. You have already completed the software installation and are running the NETGEAR Add Printer Wizard. Advanced Settings Advanced users may want to change the default name of the Print Server or make other changes in the settings. There are 2 ways to administer your NETGEAR Print Server. The Reference Manual on the Resource CD has full instructions. a. Open a Web browser and go to the IP address for the print server. (For example, type http://192.168.0.150 and click Go.) or b. You can use the NETGEAR Print Server Administration program. Click Start. Point to Programs and click NETGEAR Print Server>NETGEAR Print Server Administration. 5
-
 1
1 -
 2
2 -
 3
3 -
 4
4 -
 5
5 -
 6
6 -
 7
7 -
 8
8 -
 9
9 -
 10
10 -
 11
11 -
 12
12 -
13
-
14
-
15
-
16
 |
 |
