Netgear RN10441D Hardware Manual - Page 83
Replace a Disk, more than one disk at a time, the system will crash.
 |
View all Netgear RN10441D manuals
Add to My Manuals
Save this manual to your list of manuals |
Page 83 highlights
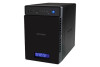
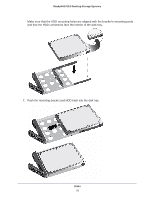
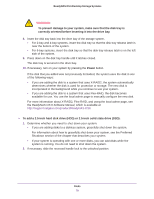
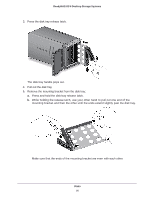
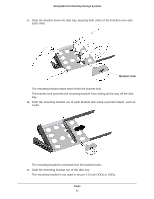
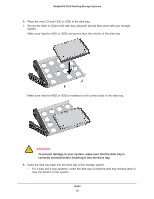
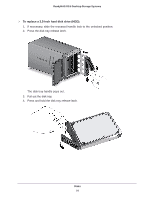
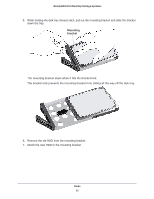
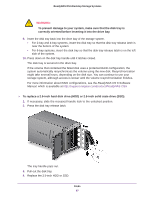
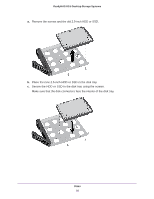
ReadyNAS OS 6 Desktop Storage Systems • For 6-bay systems, insert the disk tray so that the disk tray release latch is on the left side of the system. 9. Press down on the disk tray handle until it latches closed. The disk tray is secured in the drive bay. 10. If necessary, turn on your system by pressing the Power button. If the disk that you added was not previously formatted, the system uses the disk in one of the following ways: • If you are adding the disk to a system that uses X-RAID2, the system automatically determines whether the disk is used for protection or storage. The new disk is incorporated in the background while you continue to use your system. • If you are adding the disk to a system that uses Flex-RAID, the disk becomes available for use. You use the local admin page to manually configure the new disk. For more information about X-RAID2, Flex-RAID, and using the local admin page, see the ReadyNAS OS 6 Software Manual, which is available at http://support.netgear.com/product/ReadyNAS-OS6. Replace a Disk If your volumes use a protected RAID configuration, your system can recover from the failure of a disk. When you replace the failed disk, the system rebuilds the volume using the new disk and no data from the volume is lost. The Disk LEDs can help you identify a failed disk. For more information, see the Status Information section of the chapter that describes your system. You can also use the local admin page to set up email alerts that notify you when a disk fails. In addition, the local admin page provides information about the failed disk. For information about RAID configurations, setting up email alerts, and using the local admin page, see the ReadyNAS OS 6 Software Manual, which is available at http://support.netgear.com/product/ReadyNAS-OS6. ReadyNAS supports hot-swap drive bays, so you do not need to power down your storage system when replacing a disk. If you are replacing a disk with a previously formatted disk, see the instructions in Previously Formatted Disks on page 74. WARNING: Replace one disk at a time. Wait for the volume to resynchronize your data before replacing another disk. If you attempt to replace more than one disk at a time, the system will crash. Disks 83
-
 1
1 -
2
-
3
-
4
-
5
-
6
-
7
-
8
-
9
-
10
-
11
-
12
-
13
-
14
-
15
-
16
-
17
-
18
-
19
-
20
-
21
-
22
-
23
-
24
-
25
-
26
-
27
-
28
-
29
-
30
-
31
-
32
-
33
-
34
-
35
-
36
-
37
-
38
-
39
-
40
-
41
-
42
-
43
-
44
-
45
-
46
-
47
-
48
-
49
-
50
-
51
-
52
-
53
-
54
-
55
-
56
-
57
-
58
-
59
-
60
-
61
-
62
-
63
-
64
-
65
-
66
-
67
-
68
-
69
-
70
-
71
-
72
-
73
-
74
-
75
-
76
-
77
-
 78
78 -
 79
79 -
 80
80 -
 81
81 -
 82
82 -
 83
83 -
 84
84 -
 85
85 -
 86
86 -
 87
87 -
 88
88 -
89
-
90
-
91
-
92
-
93
-
94
-
95
-
96
-
97
-
98
-
99
-
100
-
101
-
102
-
103
-
104
-
105
-
106
-
107
 |
 |