Netgear RNDP4430D Hardware Manual - Page 34
take several hours depending on the disk size. You can continue to use your ReadyNAS
 |
View all Netgear RNDP4430D manuals
Add to My Manuals
Save this manual to your list of manuals |
Page 34 highlights
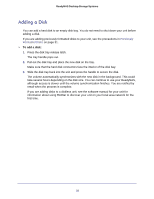
ReadyNAS Desktop Storage Systems 3. Make sure that the hard disk connectors face the interior of the disk bay. 4. Slide the disk tray back into the unit and press the handle to secure the disk. The volume automatically synchronizes with the new disk in the background. This could take several hours depending on the disk size. You can continue to use your ReadyNAS, although access is slower until the volume synchronization finishes. You are notified by email when the process is complete. 34
-
 1
1 -
2
-
3
-
4
-
5
-
6
-
7
-
8
-
9
-
10
-
11
-
12
-
13
-
14
-
15
-
16
-
17
-
18
-
19
-
20
-
21
-
22
-
23
-
24
-
25
-
26
-
27
-
28
-
 29
29 -
 30
30 -
 31
31 -
 32
32 -
 33
33 -
 34
34 -
 35
35 -
 36
36 -
 37
37 -
 38
38 -
 39
39 -
40
-
41
-
42
-
43
-
44
-
45
-
46
-
47
-
48
 |
 |

34
ReadyNAS Desktop Storage Systems
3.
Make sure that the hard disk connectors face the interior of the disk bay.
4.
Slide the disk tray back into the unit and press the handle to secure the disk.
The volume automatically synchronizes with the new disk in the background. This could
take several hours depending on the disk size. You can continue to use your ReadyNAS,
although access is slower until the volume synchronization finishes. You are notified by
email when the process is complete.