Nikon 26114 P80 User's Manual - Page 38
Step 2 Frame a Picture, Using the Electronic Viewfinder, Using the Zoom
 |
UPC - 018208261147
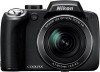
View all Nikon 26114 manuals
Add to My Manuals
Save this manual to your list of manuals |
Page 38 highlights
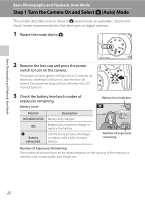
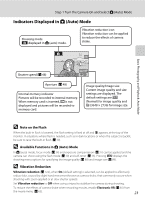
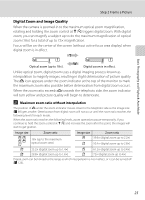
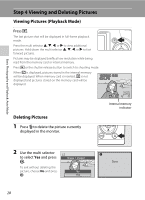
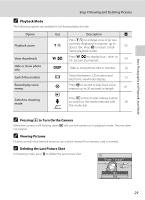
Step 2 Frame a Picture 1 Ready the camera. Hold the camera steadily in both hands, keeping your fingers and other objects away from the lens, AF-assist illuminator, microphone, speaker and m (flash pop-up) button. Basic Photography and Playback: Auto Mode 2 Frame the picture. Position the main subject near the center of the monitor. 1/125 FF24.83 20 Using the Electronic Viewfinder Use the electronic viewfinder to frame pictures when bright light makes it difficult to see the display in the LCD monitor. Press x to switch to the electronic viewfinder (A 13). When the diopter for the electronic viewfinder is out of focus, rotate the diopter adjustment control to the position in which the subject is most visible (A 13). Using the Zoom Use the zoom control to activate optical zoom. Rotate the zoom control to f (h) to zoom out, increasing the area visible in the frame, or g (i) to zoom in so that the subject fills a larger area of the frame. Rotating the zoom control all the way in either direction will adjust the zoom quickly, while rotating the control partially will adjust the zoom slowly. A zoom indicator is displayed at the top of the monitor when the zoom control is rotated. 24 Zoom out Zoom in Optical Digital zoom zoom
-
 1
1 -
2
-
3
-
4
-
5
-
6
-
7
-
8
-
9
-
10
-
11
-
12
-
13
-
14
-
15
-
16
-
17
-
18
-
19
-
20
-
21
-
22
-
23
-
24
-
25
-
26
-
27
-
28
-
29
-
30
-
31
-
32
-
 33
33 -
 34
34 -
 35
35 -
 36
36 -
 37
37 -
 38
38 -
 39
39 -
 40
40 -
 41
41 -
 42
42 -
 43
43 -
44
-
45
-
46
-
47
-
48
-
49
-
50
-
51
-
52
-
53
-
54
-
55
-
56
-
57
-
58
-
59
-
60
-
61
-
62
-
63
-
64
-
65
-
66
-
67
-
68
-
69
-
70
-
71
-
72
-
73
-
74
-
75
-
76
-
77
-
78
-
79
-
80
-
81
-
82
-
83
-
84
-
85
-
86
-
87
-
88
-
89
-
90
-
91
-
92
-
93
-
94
-
95
-
96
-
97
-
98
-
99
-
100
-
101
-
102
-
103
-
104
-
105
-
106
-
107
-
108
-
109
-
110
-
111
-
112
-
113
-
114
-
115
-
116
-
117
-
118
-
119
-
120
-
121
-
122
-
123
-
124
-
125
-
126
-
127
-
128
-
129
-
130
-
131
-
132
-
133
-
134
-
135
-
136
-
137
-
138
-
139
-
140
-
141
-
142
-
143
-
144
-
145
-
146
-
147
-
148
-
149
-
150
-
151
-
152
-
153
-
154
-
155
-
156
-
157
-
158
-
159
-
160
-
161
-
162
-
163
-
164
-
165
-
166
-
167
 |
 |
