Nikon COOLPIX P510 User Manual - Page 163
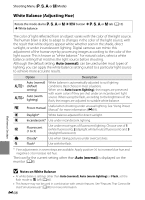
Shooting Menu (P, S, A or M Mode), Image Quality and Image Size
 |
View all Nikon COOLPIX P510 manuals
Add to My Manuals
Save this manual to your list of manuals |
Page 163 highlights
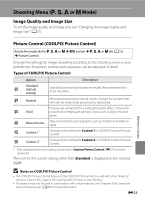
Shooting Menu (j, k, l or m Mode) Image Quality and Image Size To set the image quality and image size, see "Changing the Image Quality and Image Size" (A77). Reference Section Picture Control (COOLPIX Picture Control) Rotate the mode dial to j, k, l or m M d button M j, k, l or m tab (A13) M Picture Control Change the settings for image recording according to the shooting scene or your preferences. Sharpness, contrast and saturation can be adjusted in detail. Types of COOLPIX Picture Control Option Description Standard b (default setting) Standard processing for balanced results. Recommended for most situations. c Neutral Minimal processing for natural results. Choose for pictures that will later be extensively processed or retouched. d Vivid Pictures are enhanced for a vivid, photoprint effect. Choose for pictures that emphasize primary colors, such as blue, red, and green. e Monochrome Take monochrome photographs such as in black-and-white or sepia. f Custom 1* Change to the setting for Custom 1 in COOLPIX Custom Picture Control. g Custom 2* Change to the setting for Custom 2 in COOLPIX Custom Picture Control. * Only displayed when the setting customized in Custom Picture Control (E37) has been registered. The icon for the current setting other than Standard is displayed on the monitor (A8). B Notes on COOLPIX Picture Control • The COOLPIX Picture Control feature of the COOLPIX P510 cannot be used with other makes of cameras, Capture NX, Capture NX 2 and ViewNX 2 Picture Control feature. • This feature may not be used in combination with certain features. See "Features That Cannot Be Used Simultaneously" (A80) for more information. E33
-
 1
1 -
2
-
3
-
4
-
5
-
6
-
7
-
8
-
9
-
10
-
11
-
12
-
13
-
14
-
15
-
16
-
17
-
18
-
19
-
20
-
21
-
22
-
23
-
24
-
25
-
26
-
27
-
28
-
29
-
30
-
31
-
32
-
33
-
34
-
35
-
36
-
37
-
38
-
39
-
40
-
41
-
42
-
43
-
44
-
45
-
46
-
47
-
48
-
49
-
50
-
51
-
52
-
53
-
54
-
55
-
56
-
57
-
58
-
59
-
60
-
61
-
62
-
63
-
64
-
65
-
66
-
67
-
68
-
69
-
70
-
71
-
72
-
73
-
74
-
75
-
76
-
77
-
78
-
79
-
80
-
81
-
82
-
83
-
84
-
85
-
86
-
87
-
88
-
89
-
90
-
91
-
92
-
93
-
94
-
95
-
96
-
97
-
98
-
99
-
100
-
101
-
102
-
103
-
104
-
105
-
106
-
107
-
108
-
109
-
110
-
111
-
112
-
113
-
114
-
115
-
116
-
117
-
118
-
119
-
120
-
121
-
122
-
123
-
124
-
125
-
126
-
127
-
128
-
129
-
130
-
131
-
132
-
133
-
134
-
135
-
136
-
137
-
138
-
139
-
140
-
141
-
142
-
143
-
144
-
145
-
146
-
147
-
148
-
149
-
150
-
151
-
152
-
153
-
154
-
155
-
156
-
157
-
 158
158 -
 159
159 -
 160
160 -
 161
161 -
 162
162 -
 163
163 -
 164
164 -
 165
165 -
 166
166 -
 167
167 -
 168
168 -
169
-
170
-
171
-
172
-
173
-
174
-
175
-
176
-
177
-
178
-
179
-
180
-
181
-
182
-
183
-
184
-
185
-
186
-
187
-
188
-
189
-
190
-
191
-
192
-
193
-
194
-
195
-
196
-
197
-
198
-
199
-
200
-
201
-
202
-
203
-
204
-
205
-
206
-
207
-
208
-
209
-
210
-
211
-
212
-
213
-
214
-
215
-
216
-
217
-
218
-
219
-
220
-
221
-
222
-
223
-
224
-
225
-
226
-
227
-
228
-
229
-
230
-
231
-
232
-
233
-
234
-
235
-
236
-
237
-
238
-
239
-
240
-
241
-
242
-
243
-
244
-
245
-
246
-
247
-
248
-
249
-
250
-
251
-
252
-
253
-
254
-
255
-
256
-
257
-
258
-
259
-
260
 |
 |
