Nikon Coolpix S4 User Manual - Page 23
Step 2 — Frame the Picture, Using a Tripod, Button - lens cap
 |
UPC - 410000220139
View all Nikon Coolpix S4 manuals
Add to My Manuals
Save this manual to your list of manuals |
Page 23 highlights
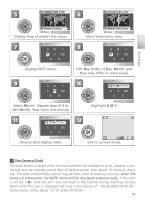
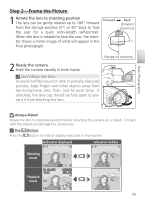
Step 2-Frame the Picture 1 Rotate the lens to shooting position The lens can be gently rotated up to 180 ° forward from the storage position (0 °) or 90 ° back to face the user for a quick arms-length self-portrait. When the lens is rotated to face the user, the monitor shows a mirror image of what will appear in the final photograph. Forward Back (toward 0° monitor) 90° 180° Range of rotation 2 Ready the camera Hold the camera steadily in both hands. Don't Block the Shot To avoid muffled sound or dark or partially obscured pictures, keep fingers and other objects away from the microphone, lens, flash, and AF-assist lamp. If attached, the lens cap should be fully open to prevent it from blocking the lens. Basic Photography Using a Tripod Rotate the lens to shooting position before mounting the camera on a tripod. Contact with the tripod can damage the camera lens. The Button Press the button to hide or display indicators in the monitor. Indicators displayed Indicators hidden Shooting mode Playback mode AUTO 9 01.10.2005 15:30 100NIKON 0001.JPG 1/ 1 13
-
 1
1 -
2
-
3
-
4
-
5
-
6
-
7
-
8
-
9
-
10
-
11
-
12
-
13
-
14
-
15
-
16
-
17
-
 18
18 -
 19
19 -
 20
20 -
 21
21 -
 22
22 -
 23
23 -
 24
24 -
 25
25 -
 26
26 -
 27
27 -
 28
28 -
29
-
30
-
31
-
32
-
33
-
34
-
35
-
36
-
37
-
38
-
39
-
40
-
41
-
42
-
43
-
44
-
45
-
46
-
47
-
48
-
49
-
50
-
51
-
52
-
53
-
54
-
55
-
56
-
57
-
58
-
59
-
60
-
61
-
62
-
63
-
64
-
65
-
66
-
67
-
68
-
69
-
70
-
71
-
72
-
73
-
74
-
75
-
76
-
77
-
78
-
79
-
80
-
81
-
82
-
83
-
84
-
85
-
86
-
87
-
88
-
89
-
90
-
91
-
92
-
93
-
94
-
95
-
96
-
97
-
98
-
99
-
100
-
101
-
102
-
103
-
104
-
105
-
106
-
107
-
108
 |
 |
