Nikon NF80B User Manual - Page 28
NOTE: Minimum aperture with CPU Nikkor lens except G-type
 |
UPC - 018208802142
View all Nikon NF80B manuals
Add to My Manuals
Save this manual to your list of manuals |
Page 28 highlights
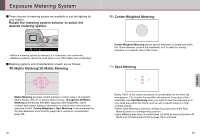
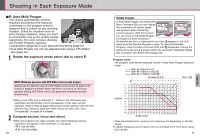
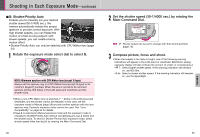
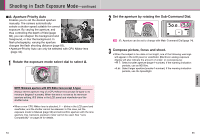
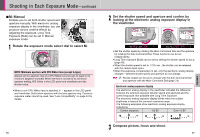
Shooting in Each Exposure Mode-continued • £: Aperture-Priority Auto Enables you to set the desired aperture manually. The camera automatically selects a shutter speed suitable for correct exposure. By varying the aperture, and thus controlling the depth of field (page 88), you can sharpen the background and foreground, or blur the background. In flash photography, varying the aperture changes the flash shooting distance (page 83). • Aperture-Priority Auto can only be selected with CPU Nikkor lens (page 34). 1 Rotate the exposure mode select dial to select £. 2 Set the aperture by rotating the Sub-Command Dial. c 12: Aperture can be set to change with Main-Command Dial (page 74). 3 Compose picture, focus and shoot. • When the subject is too dark or too bright, one of the following warnings will appear in the LCD panel or viewfinder. (Electronic analog exposure display will also indicate the amount of under- or overexposure.) • H1: Select smaller aperture (larger f-number). If the warning indication persists, use an ND filtre. • Lo: Select larger aperture (smaller f-number). If the warning indication persists, use the Speedlight. Exposure NOTE: Minimum aperture with CPU Nikkor lens (except G-type) Always set the aperture ring of a CPU Nikkor lens (except G-type) to its minimum (largest f-number). When the lens is not set to its minimum aperture setting, ƒEE blinks in the LCD panel and viewfinder and the shutter locks. • When a non-CPU Nikkor lens is attached, ƒ-- blinks in the LCD panel and viewfinder, and the shutter cannot be released. In this case, set the exposure mode to Manual (page 56) and set/confirm aperture with the lens aperture ring. Camera's exposure meter cannot be used. See "Lens Compatibility" on page 34 for details. 54 55
-
 1
1 -
2
-
3
-
4
-
5
-
6
-
7
-
8
-
9
-
10
-
11
-
12
-
13
-
14
-
15
-
16
-
17
-
18
-
19
-
20
-
21
-
22
-
 23
23 -
 24
24 -
 25
25 -
 26
26 -
 27
27 -
 28
28 -
 29
29 -
 30
30 -
 31
31 -
 32
32 -
 33
33 -
34
-
35
-
36
-
37
-
38
-
39
-
40
-
41
-
42
-
43
-
44
-
45
-
46
-
47
-
48
-
49
-
50
-
51
-
52
-
53
-
54
-
55
-
56
-
57
-
58
-
59
 |
 |
