Nikon S1000pj S1000pj User's Manual - Page 149
Using the projector, Displaying Pictures with the Projector (Projector Mode), Projecting Pictures - coolpix memory
 |
UPC - 018208261864
View all Nikon S1000pj manuals
Add to My Manuals
Save this manual to your list of manuals |
Page 149 highlights
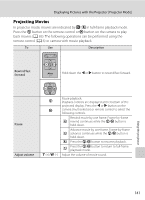
Using the projector Displaying Pictures with the Projector (Projector Mode) The COOLPIX S1000pj is equipped with a builtin projector. The ability to project pictures and movies with simple operation makes for a convenient way of enjoying photos at gatherings of family and friends. Projecting Pictures 1 Place the camera. Place the projector stand (supplied) on a stable and level surface such as a table. Place the camera on the projector stand so that the projection on the stand fits into the camera's tripod socket. Position the camera so that the projector window is pointed at a flat white surface or movie or projector screen. Tripod socket Projector stand The projection distance between the camera and screen should be approximately 26 cm to 2 m (10 in. to 6 ft. 6 in.) (A 139). 2 Turn on the camera and press the P button. Using the projector The camera enters projector mode and a picture stored in the internal memory or on a memory card inserted into the camera is projected in fullframe playback mode onto the screen. The camera's monitor turns off while projecting. 3 Adjust the camera position. To change the projected picture size, adjust the distance between the camera and screen. Adjust the projection angle to reduce picture distortion. B Projector Distortion When the supplied projector stand is used, pictures are projected at a slightly upward angle to prevent the surface on which the stand and camera are placed from obstructing picture projection. The slightly upward angle of projection causes a type of distortion known as a keystone effect, skewing picture dimensions. Using a tripod rather than the supplied projector stand to stabilize the camera simplifies camera positioning and may also reduce the keystone effect. 137
-
 1
1 -
2
-
3
-
4
-
5
-
6
-
7
-
8
-
9
-
10
-
11
-
12
-
13
-
14
-
15
-
16
-
17
-
18
-
19
-
20
-
21
-
22
-
23
-
24
-
25
-
26
-
27
-
28
-
29
-
30
-
31
-
32
-
33
-
34
-
35
-
36
-
37
-
38
-
39
-
40
-
41
-
42
-
43
-
44
-
45
-
46
-
47
-
48
-
49
-
50
-
51
-
52
-
53
-
54
-
55
-
56
-
57
-
58
-
59
-
60
-
61
-
62
-
63
-
64
-
65
-
66
-
67
-
68
-
69
-
70
-
71
-
72
-
73
-
74
-
75
-
76
-
77
-
78
-
79
-
80
-
81
-
82
-
83
-
84
-
85
-
86
-
87
-
88
-
89
-
90
-
91
-
92
-
93
-
94
-
95
-
96
-
97
-
98
-
99
-
100
-
101
-
102
-
103
-
104
-
105
-
106
-
107
-
108
-
109
-
110
-
111
-
112
-
113
-
114
-
115
-
116
-
117
-
118
-
119
-
120
-
121
-
122
-
123
-
124
-
125
-
126
-
127
-
128
-
129
-
130
-
131
-
132
-
133
-
134
-
135
-
136
-
137
-
138
-
139
-
140
-
141
-
142
-
143
-
 144
144 -
 145
145 -
 146
146 -
 147
147 -
 148
148 -
 149
149 -
 150
150 -
 151
151 -
 152
152 -
 153
153 -
 154
154 -
155
-
156
-
157
-
158
-
159
-
160
-
161
-
162
-
163
-
164
-
165
-
166
-
167
-
168
-
169
-
170
-
171
-
172
-
173
-
174
-
175
-
176
-
177
-
178
-
179
-
180
-
181
-
182
-
183
-
184
 |
 |
